Create an Online Store With Ratals Commerce - A Self-Hosted eCommerce Platform
Ratals Commerce is not just an ecommerce platform - it is a self-hosted, business-first commerce system. Vendors, inventory, products, fulfillment, customers, and revenue tools are all connected through a single platform, designed to reflect how a business actually operates rather than how most ecommerce software is built.
That business-first structure is intentional. Ratals Commerce is built on the same foundation as Ratals ERP, allowing businesses to expand into purchasing, accounting, and operations without rebuilding their data, workflows, or processes. Everything you configure in Commerce becomes part of the foundation your business runs on - at a flat monthly rate with no transaction fees on your sales.
This guide walks through every major component of Ratals Commerce in the order you would encounter them, from initial setup through daily operations, explaining how each feature works and how the different parts of the platform connect.
Ratals Commerce is a self-hosted, open source ecommerce platform built on top of Ratals CMS, which is open-source and available as a free download here. Once you have Ratals CMS installed on your server, you can purchase a Commerce license to upgrade your installation and start selling products online.
Ratals CMS handles the foundation - admin access, content management, and your public-facing website. When you are ready to add a store, Ratals Commerce builds directly on top of that foundation without requiring a separate installation or data migration. You can purchase a Commerce license on our pricing page here. After checkout you will receive a license key to enter into your installed CMS, which will then prompt you to update your software to the Commerce version.
Ratals is built in tiers. Businesses can start with the free CMS, upgrade to Commerce when they are ready to sell products online, and later expand into ERP for purchasing, accounting, and operational management. For businesses looking to leverage AI throughout the platform, Ratals AI includes all functionality from CMS, Commerce, and ERP in a single license.
How Ratals Commerce Works
Before configuring your store, it helps to understand how Ratals Commerce is structured. Unlike most ecommerce platforms that combine products, inventory, and storefront pages into a single record, Ratals separates these responsibilities into distinct components. This separation gives you greater flexibility, makes large catalogs easier to manage, and allows the platform to scale from a simple online store to a full ERP-driven operation without restructuring how your data is organized.
Ratals Commerce is built around five core components that work together through every transaction.
Inventory
Inventory is the foundation of Ratals Commerce. Every physical product, digital product, service, subscription, or license key begins as an inventory item. Inventory records contain pricing, costs, shipping dimensions, tax settings, attributes, and everything else needed to define how an item behaves through the checkout process.
Inventory does not have a public URL and is never viewed directly by customers. Instead, inventory is attached to product pages and categories where it becomes available for purchase.
Product Pages
Product pages are the storefront layer of Ratals Commerce. They provide the URL customers visit to view a product and are responsible for displaying inventory, media, specifications, reviews, questions and answers, pricing, and the add to cart experience.
A single product page can display one inventory item, thousands of variants, or an entire collection of related products. Because product pages and inventory are separate records, you can control how products are presented without touching the underlying inventory data.
Categories
Categories give customers a way to browse your catalog. Products and inventory items are assigned to categories and displayed according to the category template in use. Attribute filters can be added to categories so customers can narrow down large catalogs by color, size, material, or any other attribute you have configured.
Orders
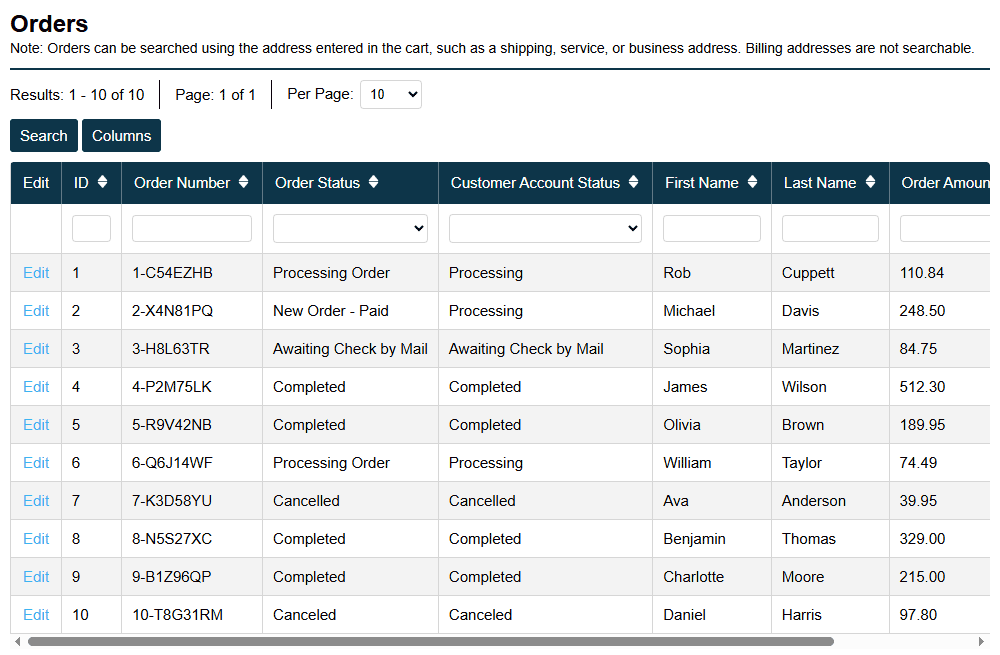
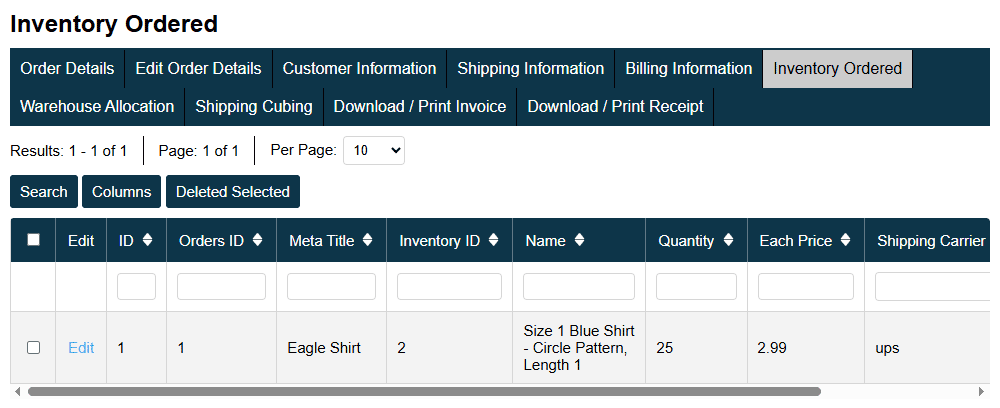
When a customer completes checkout, Ratals Commerce creates an order record containing the items purchased, customer information, payment details, shipping information, and fulfillment status. Orders become the operational hub for fulfillment, customer communication, reporting, and accounting integrations when Ratals ERP is enabled.
Shipping Centers
Shipping centers represent the physical locations inventory is fulfilled from - whether that is your own warehouse, a dropship supplier, or a combination of both. Ratals uses shipping center locations, inventory availability, and customer geography to determine where an order should be allocated and how shipping rates should be calculated at checkout.
How Everything Connects
The flow through these components follows a consistent path:
Inventory defines what is being sold. Product pages present it to customers. Categories help customers discover it. A customer account is created when applicable. Orders record what was purchased. Shipping centers fulfill those orders. Each section of this guide builds on these relationships - understanding this structure first will make everything that follows much easier to follow.
Brands
Brands are one of the first things you will set up in Ratals Commerce. If you resell multiple brands, create each one individually. If you sell only your own brand, create a single entry for it. Every brand you create becomes available as a dropdown option when creating inventory, making it easy to filter and manage stock as your catalog grows.
Once created, brands become available throughout Commerce. They can be displayed on product pages, used for catalog filtering, included in shopping feeds, and referenced on order records. Keeping products organized by brand makes it easier to manage large catalogs while giving customers additional ways to browse your store.
Vendors
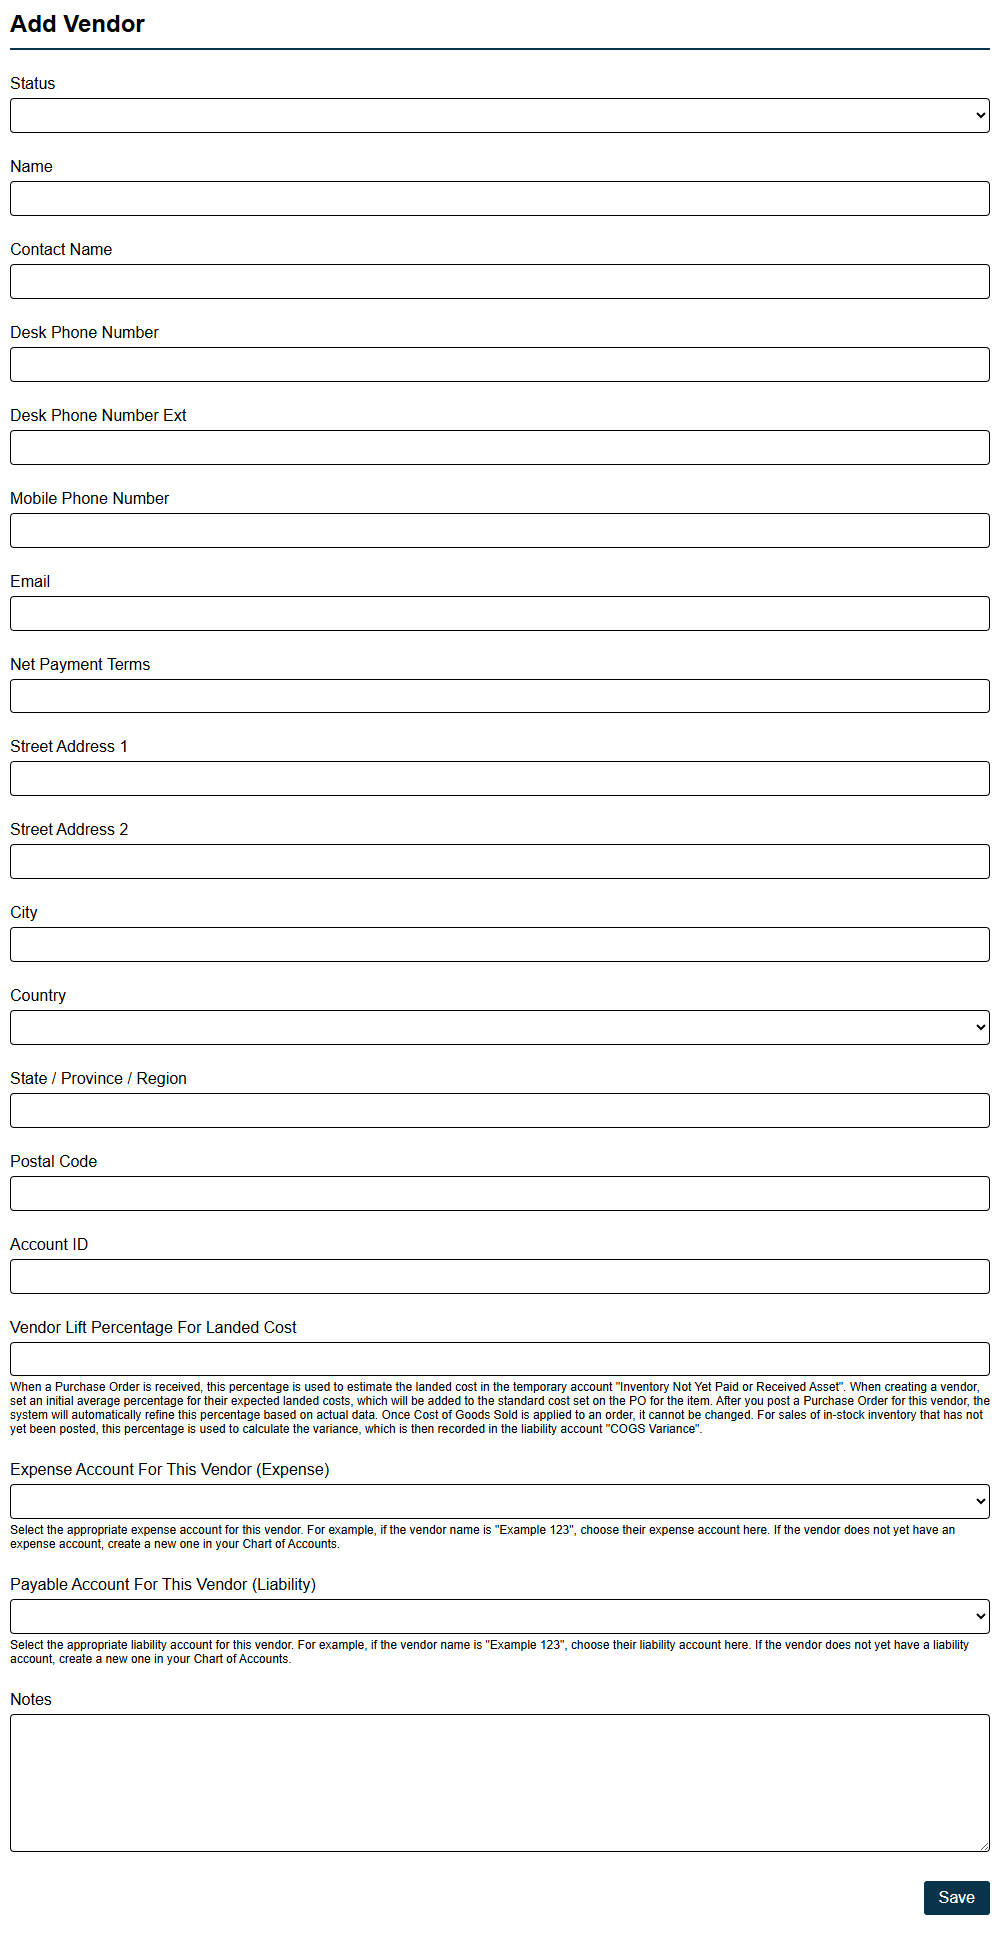
Vendors represent the suppliers you purchase inventory from. Each vendor you create can be attached to inventory items, giving you a clear record of where products are sourced from across your catalog.
When setting up a vendor, you can store important business information including company name, address, contact details, and net payment terms. Keeping this information attached to the vendor record makes it easy to reference supplier details as inventory is purchased, received, and managed throughout its lifecycle. As your catalog grows and inventory is sourced from multiple vendors, having supplier information connected directly to inventory records makes it easier to track purchasing activity and maintain accurate product sourcing information.
Vendor records are designed to grow with your business. Information entered at the Commerce level carries forward as additional modules are enabled - net payment terms, contact information, and purchasing details can all be used by Ratals ERP to automate purchasing and accounts payable workflows. Once ERP is enabled, vendor records can also be linked directly to the appropriate chart of account, allowing accounts payable transactions to flow through the accounting system automatically.
Currency
Currency settings control how prices are displayed across your websites and how pricing is adjusted for different markets. When setting up Ratals Commerce, you will configure your default currency including the currency symbol, symbol position, thousand separator, decimal separator, and number of decimal places displayed.
For businesses operating internationally, a different currency configuration can be assigned to each domain or subdomain connected to your account. This allows you to present pricing in the format customers expect for their region while managing all websites from a single platform.
Ratals CMS includes built-in hreflang support, which works alongside your regional currency configuration to signal to search engines and AI agents which version of your site is intended for which region and language. When a customer searches from a specific country or region, search engines and AI agents can use those hreflang signals to direct them to the correct domain or subdomain - where the right currency and pricing are already configured and waiting for them. This means your international setup works not just for customers who find your site directly, but for those arriving through search and AI-driven recommendations as well.
Inventory pricing serves as the foundation for all product pricing throughout the system. When inventory is created, a base price is assigned using your primary business currency. Additional currencies can then be configured with exchange rate adjustments that increase or decrease pricing relative to that base price. When the base price of an inventory item changes, pricing for all connected currencies is recalculated automatically - eliminating the need to manually update prices across every currency whenever costs or selling prices change.
When customers browse a website, pricing is displayed using the currency assigned to that domain or subdomain. Currency symbols, separators, decimal formatting, and exchange rate adjustments are all applied automatically, ensuring customers see pricing in the correct format for their market.
Because payment gateways process transactions in standardized numeric formats, Ratals separates pricing presentation from payment processing. Exchange rate adjustments are applied when pricing is displayed and calculated, while transaction amounts are submitted in the format required by the payment gateway. This keeps pricing consistent across multiple currencies while remaining compatible with supported payment processors.
Sales Tax
Sales tax settings allow you to configure the tax and VAT rates collected from customers and passed on to the appropriate tax authority. Because tax requirements vary significantly by location, Ratals offers two approaches to tax collection: rates configured at the postal code level, or broader rates set at the state, region, or province level.
Postal Code
Postal code configuration allows you to set an exact tax rate for each location you sell in. This provides granular control over collection, ensuring the precise rate required for each postal code is applied to every order.
State, Region, or Province
When configuring by state, region, or province, you enter the lowest applicable rate for that area. This simplifies management by letting you collect at a single rate per region rather than tracking thousands of individual postal code rates. You remain responsible for any difference between the rate collected and the actual rate that applies at the time of filing.
Tax on Shipping
Each tax rate you configure includes a setting to control whether tax is charged on shipping. Some jurisdictions require tax to be collected on shipping charges while others do not, and this can vary between locations within the same country. Because this requirement differs by location, the setting is controlled at the individual rate level rather than globally - giving you precise control over which locations charge tax on shipping and which do not.
Tax and VAT compliance is complex, and rules vary by jurisdiction. Ratals provides the tools to configure and collect based on your requirements - how you structure your rates and meet your filing obligations is specific to your business and locations. We recommend working with a tax professional if you are unsure which approach is right for you.
Avalara tax integration is planned for a future release, which will allow businesses to automate tax rate calculation using Avalara's real-time rate database. Once available, this will be an optional add-on for businesses that require automated compliance across multiple jurisdictions.
Shipping Centers
Shipping centers represent the locations you stock or dropship products from. You can create an unlimited number of shipping centers to reflect every warehouse, fulfillment location, or dropship supplier in your operation.
Tracked vs. Untracked Locations
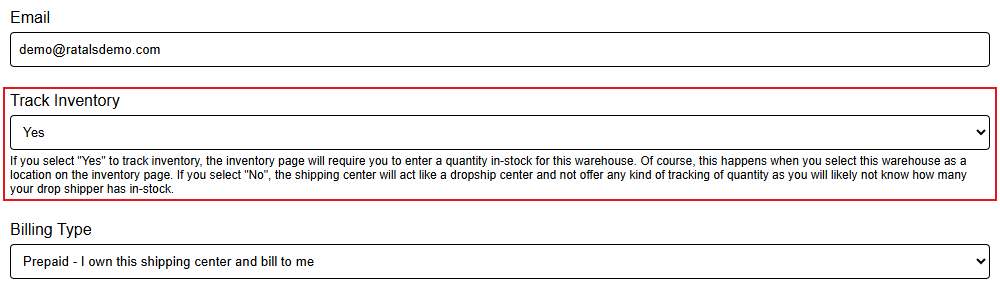
When creating a shipping center, you choose whether that location tracks inventory quantities or not. This single setting determines how that location behaves throughout the system.
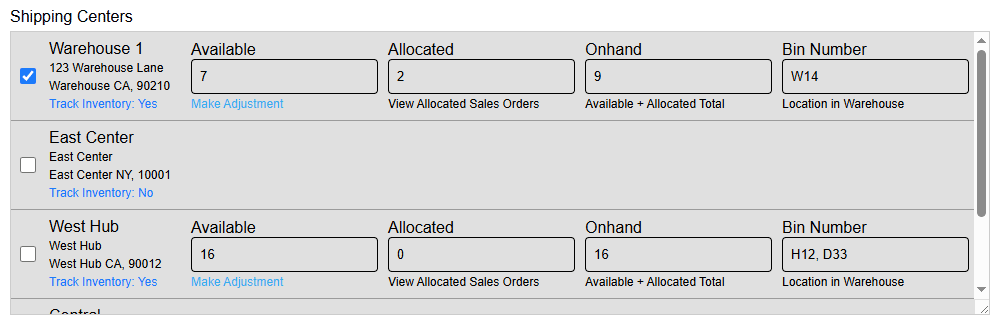
Shipping centers that track quantities maintain available and allocated counts for every inventory item assigned to that location. As orders are placed, Ratals Commerce automatically reduces available quantities and allocates them to the order. When an order ships, the allocated quantity is depleted based on the number of units included in the shipment - giving you a clear picture of what is on hand and what is committed to open orders at every stocked location.
Shipping centers that do not track quantities behave as dropship locations. No quantity fields are displayed on the inventory page for that location, and the system treats supply as unlimited - orders can ship from that location without any stock level being maintained or depleted.
Location Coordinates
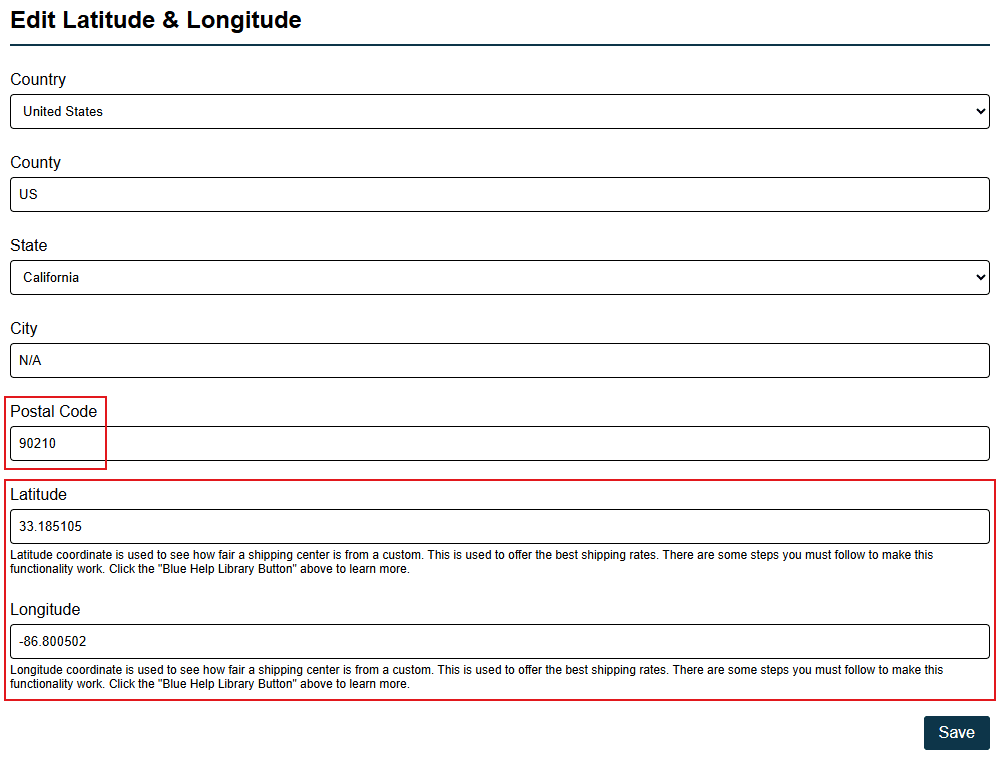
Each shipping center requires a latitude and longitude coordinate for its physical location. Ratals uses these coordinates to calculate the closest shipping center to a customer based on their postal code or region, which determines which location is used for shipping quotes and inventory allocation. This connects directly to the Latitudes & Longitudes section covered later in this guide.
Ratals Commerce uses these setting to determine which shipping centers are eligible to fulfill an order based on the customer's location, and which quantities are available to that customer.
Backorders
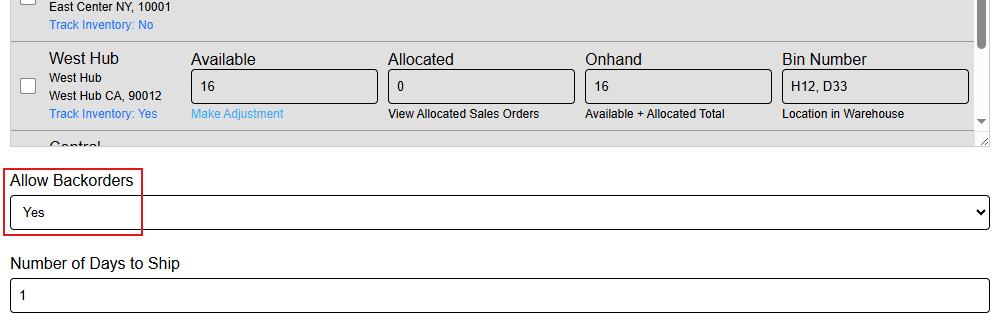
If you enable Allow Backorders on an inventory item, your store will continue to accept orders for that item even when no stock is available at any shipping center. This keeps the item purchasable while you wait for new stock to arrive rather than turning customers away.
Digital Products and Services
Shipping centers are only required for physical products that need to be shipped to a customer. If you sell digital products or services where no shipment is required, you do not need to configure a shipping center to create that inventory.
Shipping Centers and Ratals ERP
When you upgrade to Ratals ERP, shipping center quantities connect directly to inventory valuation through a two-step receiving process. When new quantities arrive, they are received into the shipping center and become available for sale immediately - no landed cost is required at this stage, so your store does not have to wait for all associated bills and expenses to be collected before the inventory can move. Once all costs related to that receipt have been received and recorded, the quantities can be posted with their full expenses, calculating the true landed cost and generating the appropriate journal entries for the inventory assets.
Shipping Carriers
Shipping carriers define how inventory items that require shipping are delivered to customers. Ratals Commerce supports four shipping methods, giving you flexibility in how shipping costs are handled and presented at checkout.
No Shipping Required
Digital products and services that require nothing to be physically delivered can be configured with the No Shipping Required method. When a customer adds one of these items to their cart, no shipping rates are calculated or displayed. This makes it straightforward to sell digital products and services alongside physical products without any custom development.
Free Shipping
If you prefer to absorb shipping costs into your product pricing, the Free Shipping method removes shipping from the checkout calculation entirely. This has become the standard approach for many online businesses, reducing checkout friction and improving conversion rates. When Free Shipping is selected on an inventory item, customers will see no shipping charge in their cart.
Flat Fee
The Flat Fee method charges a fixed shipping amount per unit ordered. This is useful when you want to pass on a predictable shipping cost without relying on carrier-calculated rates. It keeps the checkout experience simple while still recovering shipping costs on a per-unit basis.
Carrier Calculated
Carrier Calculated shipping passes the real cost of shipping on to the customer by requesting live rates from your configured carriers at checkout. Ratals Commerce checks the destination country against the carriers you have configured for that country, requests rates from each enabled carrier, and returns the lowest rate to the customer.
Because Ratals Commerce depends on carriers responding with rates in real time, it is best to configure no more than two or three carriers per country. The more carriers enabled for a destination, the longer the customer waits for rates to be returned and displayed.
For businesses that want to recover margin on shipping, each carrier can be configured with a percentage markup. The markup is applied automatically to the returned rate, and both the base carrier rate and the markup amount are visible on the order record as part of your shipping margin.
Note: Shipping rates are calculated based on a real cubing of the products being ordered. This is covered in detail in the Shipping Cubing and Rates section.
When an order is placed, the carrier and service level selected by the customer - such as ground or next day air - are recorded on the order. You can control which services are available to customers directly on each carrier setup page by enabling or disabling individual service levels.
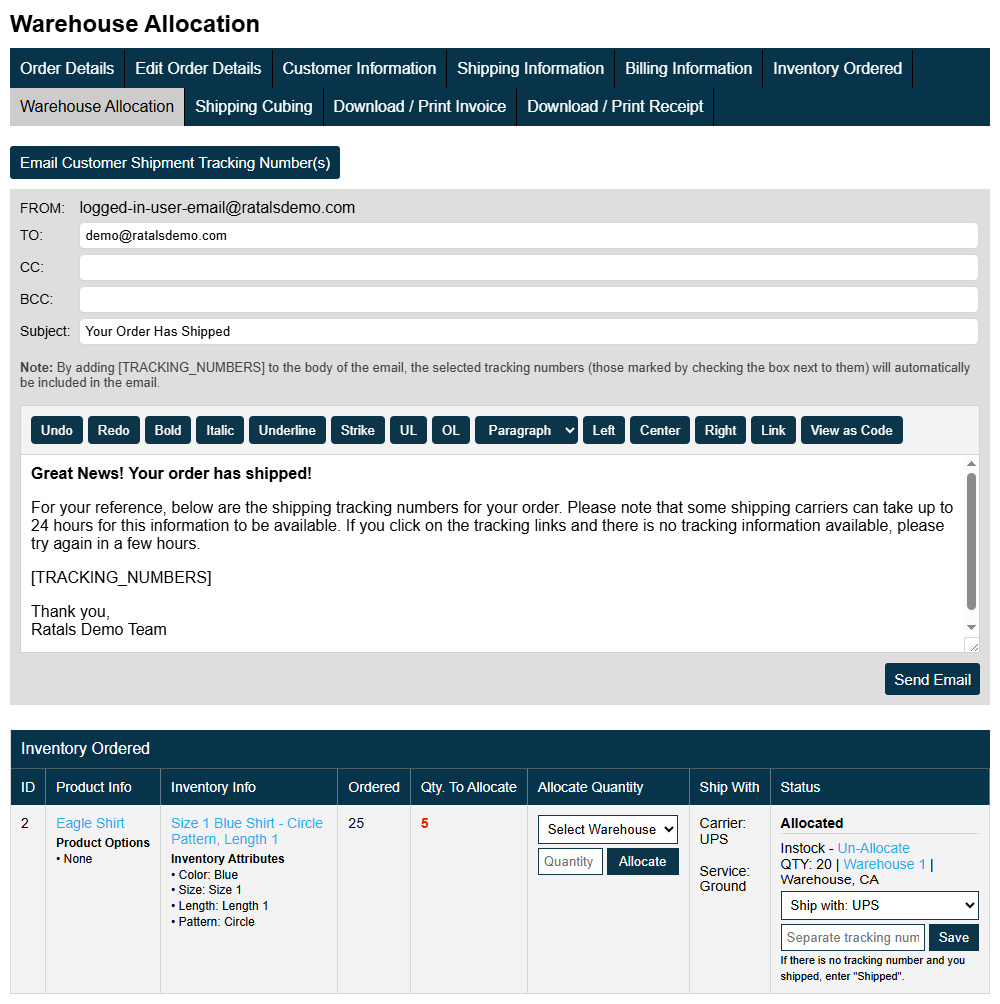
When processing an order, you can select the carrier used for the shipment - even if it differs from the lowest rate returned at checkout - and enter the tracking number. The tracking number is displayed in the customer account and can trigger a shipping confirmation email from within the admin interface.
Custom Carrier API Setup
If you need to quote rates from a carrier not already supported in Ratals Commerce, you can configure a custom carrier connection through the API. This requires development work, as each carrier returns rate responses in a different format and structure.
Latitudes & Longitudes
Ratals Commerce uses latitude and longitude coordinates to determine which shipping centers are closest to a customer when a shipping quote is requested. This ensures orders are allocated to the nearest available location, keeping shipping costs as low as possible and improving checkout conversion rates.
There are two ways to configure location coordinates, and which you choose depends on how many shipping centers you have and how much granularity you need.
Postal Code
Postal code configuration allows you to set a latitude and longitude for every postal code in the countries you ship to. When a customer requests a shipping quote, Ratals Commerce matches their delivery postal code against your configured coordinates to identify the closest shipping centers. This approach provides the most precise proximity matching and is best suited for businesses with multiple shipping centers spread across different areas within the same state, region, or province.
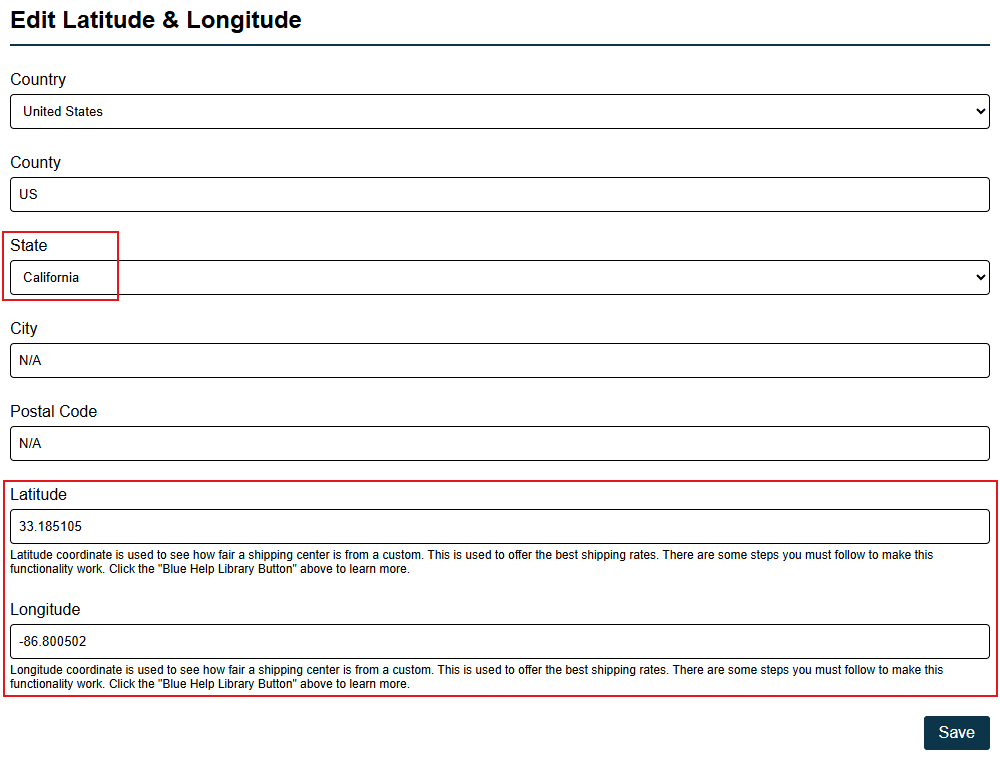
State, Region, or Province
If you prefer a more manageable setup, you can configure a single centralized coordinate for each state, region, or province instead of setting individual postal codes. Ratals Commerce then uses these broader coordinates to determine which shipping centers are closest to the customer's delivery location. This approach works well for businesses with fewer shipping centers or those spread across different states, regions, or provinces rather than concentrated within the same one.
For most businesses, state, region, or province is all you will ever need. The purpose of these coordinates is simply to identify which shipping center is closest to the customer - the difference in the actual shipping rate between using a centralized state coordinate versus an exact postal code is minimal. Unless you have a specific reason to require pinpoint precision, state, region, or province will serve you well and is typically a set it and forget it.
How Shipping Center Selection Works
When determining which shipping center to use for an order, Ratals Commerce evaluates the closest locations in a specific priority order. Tracked inventory locations are checked first - if stock is available at a warehouse, that location is used since moving your own inventory is the priority. If no tracked stock is available, the closest dropship location is used next. If neither has availability but the inventory item allows backorders, the closest shipping center assigned to that inventory item is selected. If none of these conditions are met, the product page converts to a request a quote form, preventing the item from being purchased until availability is restored. Whichever center qualifies is then used to request shipping quotes and allocate the order for fulfillment.
Default Configuration
The Latitudes & Longitudes section is where you enter your location coordinates. Whether to use postal code or state, region, or province matching is configured separately in the Shipping Settings section covered later in this guide.
By default, Ratals Commerce is configured to use state, region, or province matching and comes pre-loaded with centralized coordinates for all US states. If you are based in the United States, this is ready to use out of the box.
Inventory Attributes
Inventory attributes are used to define the selectable options on a product page - things like color, size, or any other characteristic a customer needs to choose before purchasing. Each attribute you create can be displayed as a color swatch, a selectable box, or a dropdown, controlling how customers interact with those options on your storefront.
Creating Attributes
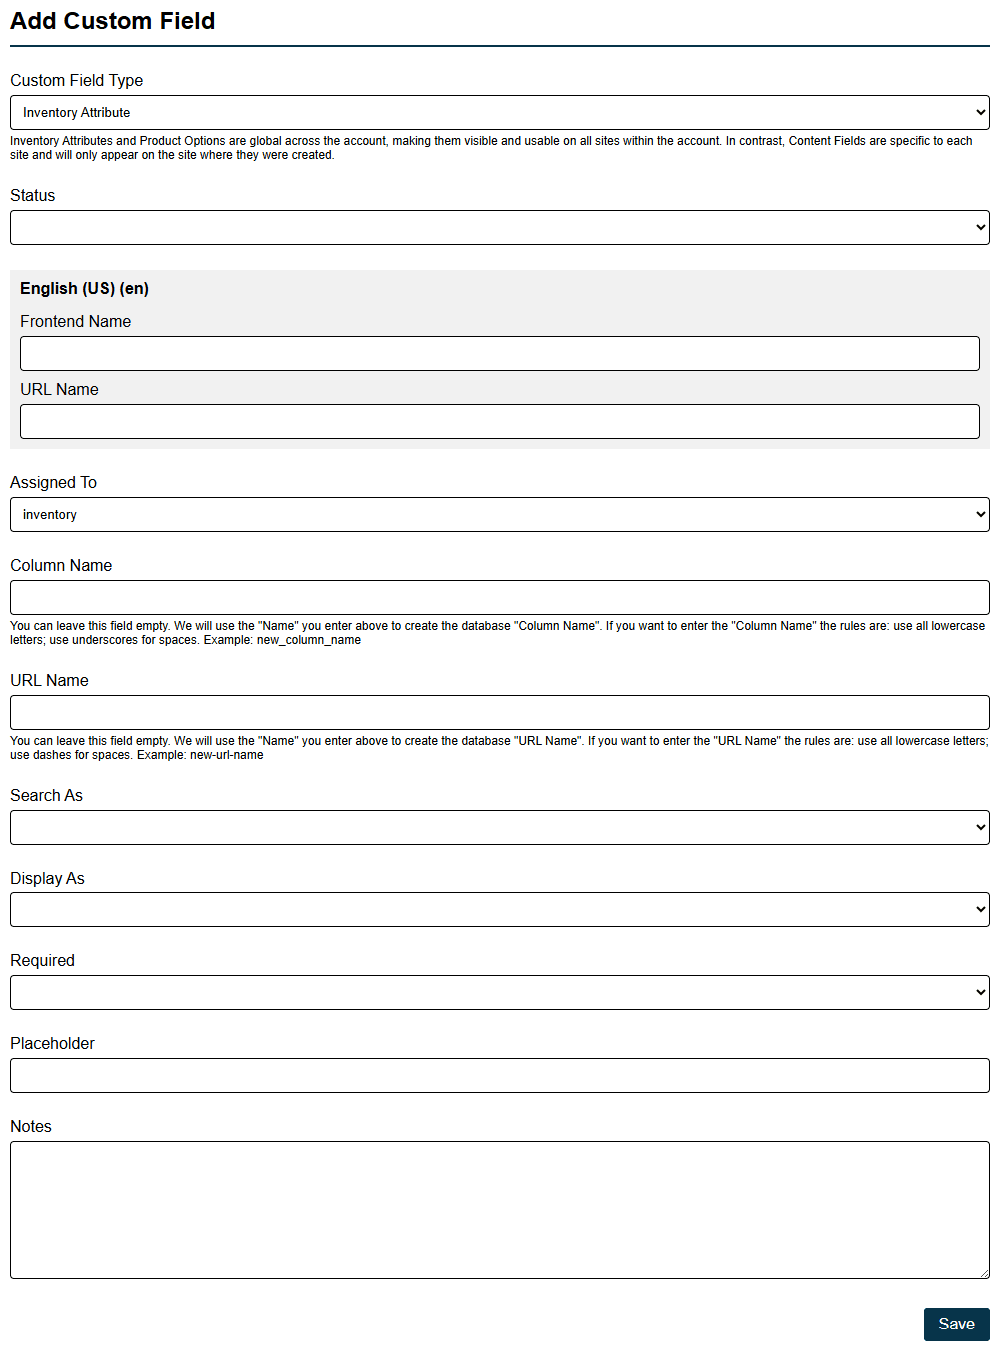
Attributes are created in the custom fields area of the admin. When setting one up, you choose how it should display and then add the options available for that attribute. Once created, the same attribute can be assigned to an unlimited number of inventory items. Any update made to the attribute automatically applies everywhere it is assigned, so you never have to update the same option in multiple places.
When setting up an attribute you will see an assign to dropdown. Regardless of what you select there, attributes will always be assigned to inventory - this is enforced by the system since attributes have no function outside of inventory items.
For businesses running multiple sites in different languages, attribute labels can be set for each language directly within the attribute setup. This means you only ever need one color attribute or one size attribute regardless of how many language-specific sites you operate - each language gets its own label while the underlying attribute remains a single shared record across your entire catalog.
How Attributes Work on Product Pages
Attributes are always a list of options the customer selects from. As a customer changes their selection on a product page, the media, item number, and specs update automatically to reflect the chosen combination. When category filters are used, attributes like color and size drive the filtering so customers can narrow down inventory within a category.
Attributes are intelligent about what they display. If an attribute includes an option that no inventory item within a category or product page is using, that option is automatically hidden. This means you can create a single color attribute listing every color you sell across your entire catalog, and each category or product page will only surface the options that are actually available.
Assigning Attributes to Inventory
Attributes are not required for every product. A basic product page with a single inventory item does not need any attributes. They are only needed when multiple inventory items need to be selectable through the same product page, such as a shirt available in multiple colors and sizes.
Attributes can be added to or removed from an inventory item at any time. You do not need to configure attributes when first creating an inventory item - they can be attached later and changed as your catalog evolves. Once an attribute is attached to an inventory item, scroll to the bottom of that inventory item's page to select the specific value for that item - such as which color or size it is - and save.
If you add an attribute to an inventory item that is already assigned to a product page, the same attribute must also be assigned to that product page for the inventory to display correctly. Both the inventory item and the product page need matching attributes - a mismatch between the two will prevent the inventory from displaying on the product page. If there is a mismatch, the product page will identify which inventory attributes do not align with what the product page has assigned, making it straightforward to locate and correct the discrepancy.
Assigned To
Before making attribute changes to an inventory item, it is worth checking how many product pages that inventory is assigned to. On the inventory page, click Assigned To in the submenu to see every product page the item is currently assigned to. If the inventory is assigned to multiple product pages, adding a new attribute will require that same attribute to be added to each of those product pages as well. Reviewing the assigned product pages first gives you a clear picture of how much work a change will require before you make it.
Searching and Filtering by Attribute
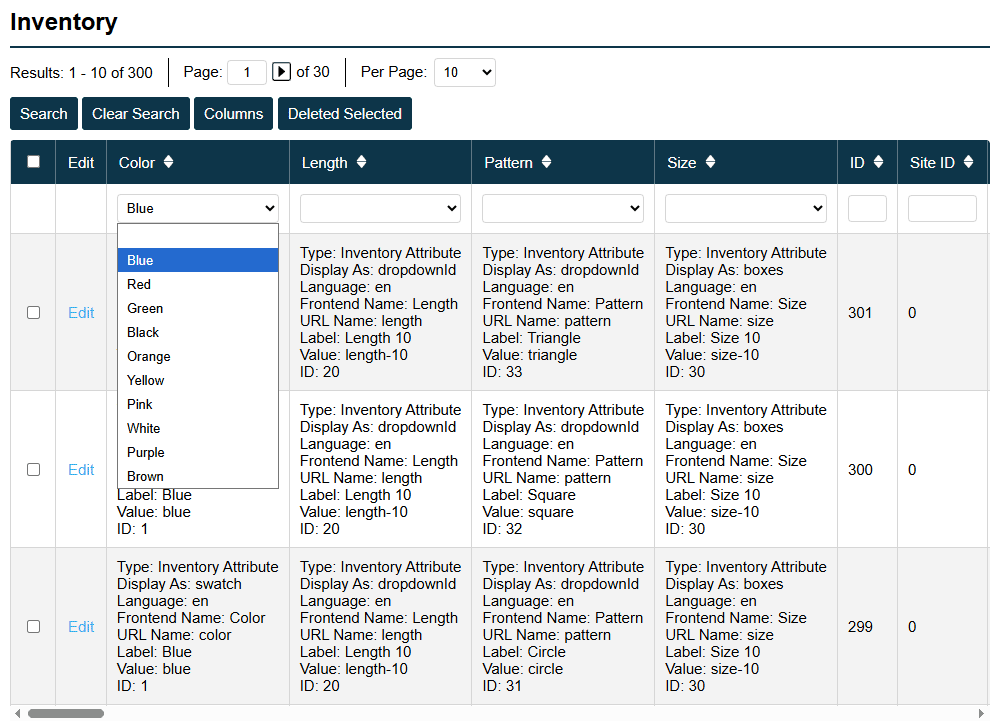
In the admin table view, attributes can be added as a column in the inventory search. This makes it easy to locate specific inventory items by their attribute values without having to open each record individually.
Attributes in Shopping Feeds
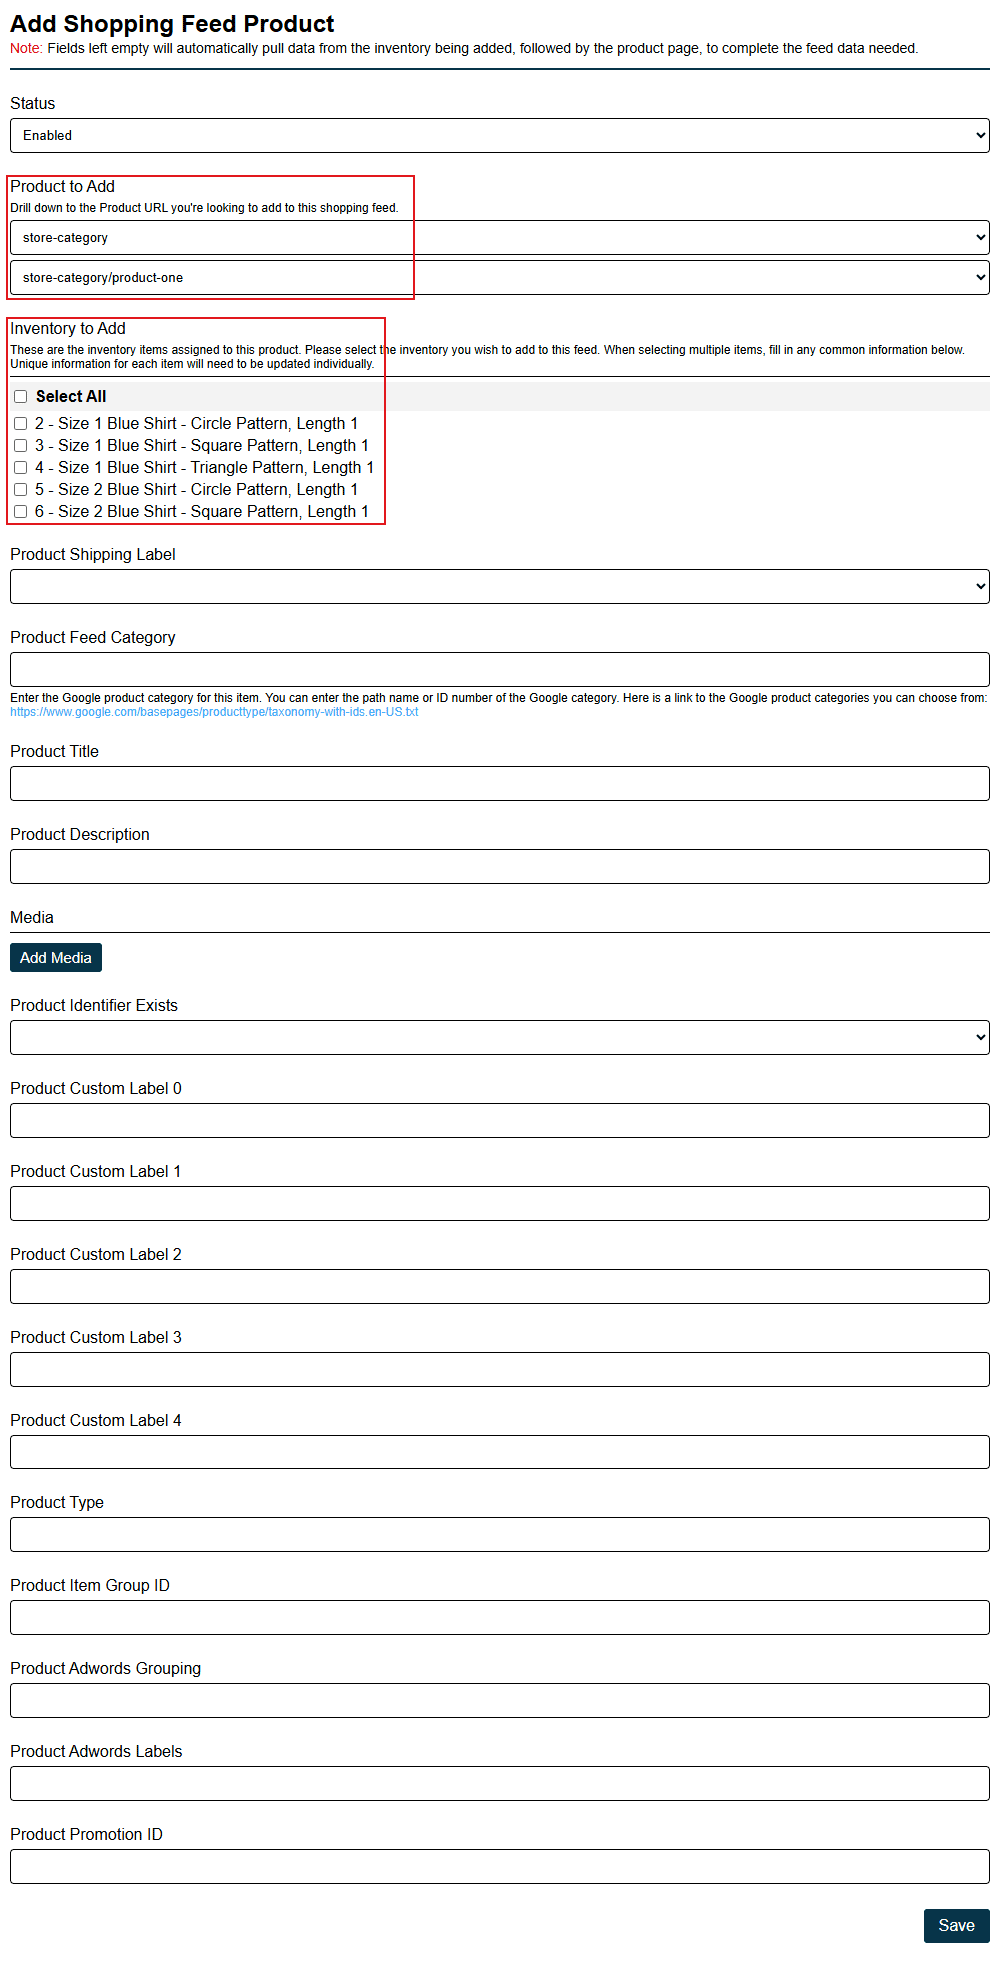
Attributes are included in Ratals Commerce shopping feeds, giving shopping engines a complete picture of each product's available options. This allows shopping engines to offer their own attribute-based filtering for your products directly on their platforms.
Attributes in Site Search
Attributes are also indexed by the Ratals Commerce site search engine. The built-in search is designed to return relevant results even when the search term does not appear directly in page content - a customer searching for "blue" will surface products where blue is an assigned attribute, even if the word blue does not appear anywhere in the product page copy. This keeps search results relevant across your entire catalog without requiring you to manually include attribute values in your page content.
Inventory
Inventory is the foundation of everything sold through Ratals Commerce - whether that is a physical product, a digital asset, or a service. Each inventory item contains a complete set of fields that tell the platform what the item is, how it is priced, how it ships, and how it behaves through the checkout process. This section walks through every field on an inventory item so you know exactly how to configure and manage each one.
Inventory Status
The status field controls whether an inventory item is active or disabled. When active, the item will display in any category or product page it is assigned to, provided it meets the requirements to appear as a sellable item. When disabled, the item is treated as discontinued and will stop displaying across all categories and product pages even if the assignments remain in place - making it a master on/off switch for the item.
Unlike many inventory systems, disabling an item in Ratals does not lock it into a permanent discontinued state. If you or your vendor decide to reactivate the item, simply switch the status back to active. There is no need to recreate the inventory item from scratch.
Item Number
Item numbers are the unique identifier for each inventory item. Item numbers are shared across both inventory and product pages, so if a product page is already using a particular item number, the system will alert you when you try to assign the same number to an inventory item.
Site search includes item numbers in its index, so customers searching by item number will see results pointing to the product pages that inventory is assigned to. Because inventory items do not have their own URLs, the product page serves as the destination for those search results.
When using the inventory variant builder covered below, item numbers are automatically generated from the database row number for each variant created, ensuring every item number remains unique without manual entry.
Name
Inventory names can be whatever you choose. When inventory is displayed in a category, the inventory name is used as the display name for that item, allowing each item in a catalog to have its own distinct name regardless of how many share a product page.
When using the inventory variant builder, you can set up a name template using attribute tags so unique names are generated automatically for each variant. For example, a name template of {size} {color} Shirt with {sleeve_length} Sleeves will produce a unique name for every combination of size, color, and sleeve length without manual entry. More on this in the variant builder section below.
Description
Inventory descriptions provide a summary of what the item is. By default, grid view category layouts do not display inventory descriptions since grid layouts are image-driven and space is limited. List view layouts, where each item occupies a full row, do display descriptions and use them to fill the additional space available.
Whether descriptions appear on category pages is controlled by the category template. Adding or removing the description short tag from the template is all that is needed to show or hide it. The same attribute tagging system used for names applies to descriptions when using the variant builder, allowing unique descriptions to be generated automatically for each variant.
Brand
The brand field assigns a brand to the inventory item from a dropdown list of all brands you have created. Refer to the Brands section above for a full explanation of how brands are used throughout the platform.
Manufacturer Part Number
If the inventory item is sourced from a third party, the manufacturer part number can be stored here. For your own products, enter your own part number. Both the brand and manufacturer part number appear on order line items in the admin, making it easy to identify and source items quickly as your catalog grows. Shopping engines also sometimes require a manufacturer part number to approve an item for display, using it to group all sellers of the same item together across their platform.
Vendor
Assigning a vendor to an inventory item connects it to that supplier for purchase order creation when using Ratals ERP. Refer to the Vendors section above for a full explanation of how vendors are used.
Vendor Item Number
Some vendors assign their own item numbers to products they stock, which can create confusion when the same item has multiple numbers across different systems. The vendor item number field stores the vendor's reference number alongside your own, making communication with that vendor straightforward. Vendor item numbers also appear on purchase orders so vendors can match your order to their own numbering system without any guesswork.
Global Trade Item Number (GTIN)
A Global Trade Item Number is a globally unique identifier assigned to a product. No two items should share the same GTIN. If you manufacture your own products and want a GTIN, they must be purchased through the appropriate issuing authority. For resellers, GTINs are typically available from the manufacturer and worth requesting if possible.
Shopping engines increasingly require GTINs to approve items in product feeds, using them to group all sellers of the same item together so they can surface pricing comparisons and sourcing options for shoppers. When a GTIN is set on an inventory item in Ratals Commerce, it is automatically included in your shopping feeds.
Media
An unlimited number of images, videos, and documentation files can be attached to an inventory item through the media slider. Media can be reordered by dragging and dropping at any time, so the display order can be updated without recreating the item. The first media item in the order is used as the thumbnail when viewing inventory in the admin table.
When inventory is attached to a product page, Ratals Commerce checks for media on the inventory item first. If media is set, it is used on the product page for that item. This means a product page with multiple inventory items attached can display different media for each attribute combination - a different set of images for each color variant, for example. If no media is set on the inventory item, the product page media is used as the default.
Media alt tags can also be set at the inventory level. If no inventory-level alt tag is set, the alt tag assigned to the media file itself is used, ensuring all media always has an alt tag in place.
When using the variant builder to create large numbers of variants - the builder can generate over 3,000 inventory items in under 30 seconds - setting media on every variant individually would be impractical. In those cases, leaving media unset on the inventory items and relying on the product page media is the recommended approach. Individual variant media can always be added later if needed.
Shipping Centers
Shipping centers connect an inventory item to the locations it can be fulfilled from and track how many units are available and allocated at each location. To activate a shipping center for an inventory item, check the checkbox next to the centers the item can ship from. All configured shipping centers will be displayed on every inventory item for selection.
When the inventory item is set to a shippable shipping method, at least one shipping center must be selected before the item can be saved. This ensures the system always has a location to quote shipping from and a source to check stock against. If you do not want to track quantities at a location even for your own stock, configure that shipping center to not track inventory - this allows the item to remain sellable without quantity management at that location.
Refer to the Shipping Centers section above for a full explanation of how shipping centers work.
Number of Days to Ship
This field displays on the product page to give customers an indication of how long it will take to prepare and hand off their order to a carrier. This is not an estimated delivery date - it represents the number of days your shipping center needs to get the item ready for shipment. It is most useful for items that take additional preparation time before they can be dispatched.
Pricing
Inventory pricing is built around four connected fields that work together to give you full control over how selling prices are set and maintained.
Standard Cost - the price your vendor charges you to purchase the item, before any additional fees to get it to your warehouse. It is the base cost of the item in accounting terms and is used as the default price on purchase orders when using Ratals ERP. Standard cost is never displayed on the front end of your website - it is an internal record of what you expect to pay for the item from your vendor.
Landed Cost - includes all expenses associated with getting an item to your warehouse - freight, duties, handling, and any other costs incurred between the vendor and your shelves. Dividing these total costs across the units received gives you the true cost of each unit in stock. When running Ratals ERP, landed cost is calculated automatically when the inventory receipt is posted. If you are running Commerce without the ERP upgrade, entering your standard cost in the landed cost field is sufficient for this level of operation.
Set Price With - provides three options for calculating the regular selling price. Manual allows you to enter the price directly. Standard Cost and Profit Margin calculates the price from your standard cost and the desired margin. Landed Cost and Profit Margin does the same using landed cost instead. This eliminates manual price calculation for each item you create.
Profit Margin - when using Standard Cost and Profit Margin or Landed Cost and Profit Margin in the Set Price With field, enter the desired profit margin percentage here. Ratals Commerce will calculate and set the regular price automatically based on the cost and margin combination.
Price - the regular selling price displayed to customers in categories and on product pages. If Set Price With is used, this field is populated automatically and can be adjusted from there. This is the price customers see and pay unless a sale price is active.
Sale Pricing
Sale Price - when an item is on sale, enter the sale price here. Categories and product pages will automatically display both the regular price and the sale price so customers can see the discount. The sale price is also visible in the cart so customers can confirm it has been applied. If no date range is set, the sale price runs indefinitely.
Sale Price From Date - if you want a sale price to begin on a future date, set that date here. The sale price will activate automatically on the date entered.
Sale Price To Date - if you want a sale price to end on a specific date, set that date here. The sale price will be removed automatically when the date passes.
Billing Frequency
Billing frequency defines how the item is charged at checkout. There are two options: One-Time Purchase and Recurring.
One-Time Purchase
A standard single transaction where the customer pays once, receives the item, and the transaction is complete. This is the most common billing frequency used in Ratals Commerce.
Recurring
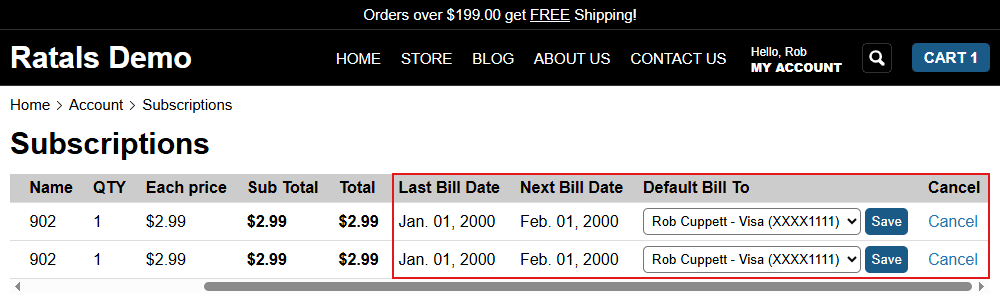
Recurring billing configures the item for repeated charges on a defined interval. When Recurring is selected, additional subscription fields become available to set up the billing.
Inventory type - classifies the nature of the item for product classification and payment gateway requirements. The three options are Physical Goods for tangible items, Services for non-tangible work or access provided over time, and Digital for software or downloadable content. This setting is used for subscription setup and payment processing requirements and does not control shipping, fulfillment, or inventory handling, which are configured separately.
Recurring Billing Interval Days - the number of days between each charge. Entering 30 will bill the customer every 30 days and automatically create a new order each time so you know to fulfill it.
Trial Price - an optional entry price for the first billing period. If set, the customer is charged the trial price at checkout instead of the regular price.
Trial Days - the number of days the trial price applies before the regular price takes over. After the trial period ends, billing continues at the regular price on the recurring interval.
PayPal Subscription Plan ID - if PayPal is enabled as a recurring payment processor, Ratals Commerce automatically requests and saves a unique Subscription Plan ID from PayPal when the inventory item is created or saved. This ID is required by PayPal to process recurring charges. If PayPal is added as a recurring processor after inventory items have already been created, each recurring inventory item must be resaved so the Subscription Plan ID can be generated and stored.
PayPal restricts recurring subscriptions to one product per subscription. When PayPal is the only payment method available, the cart will limit customers to one recurring item at a time in accordance with PayPal's requirements. If you also accept credit card payments and a customer adds more than one recurring item to their cart, PayPal will automatically be hidden as a payment option for that session, allowing the customer to complete their purchase with multiple subscription items using their card instead.
Default Addon Unit Label - for recurring items that include per-seat or per-user pricing, this field sets the label that appears on receipts and invoices so customers know what the charge represents.
Default Addon Unit Price - the price per additional unit, such as per software seat or per user. This amount is multiplied by the number of units assigned to the customer's subscription to calculate the addon charge.
Addon unit quantities are set at the subscription record level in the database, not on the inventory item itself. By default, new subscriptions are created with an addon unit quantity of zero. If your billing model requires addon units to update automatically - for example, when a customer adds seats in a connected software system - that update logic would need to be built by your development team by updating the subscription_addon_unit_quantity column on the customer's subscription record. The functionality is fully in place and ready to use.
Recurring billing also requires a cron job to trigger charges on the configured interval. Full setup instructions are available here.
Shipping Dimensions and Weight
The shipping dimensions and weight fields define the size and weight of the packaged item as it will be shipped. These are the measurements of the box, not the product itself, and are used for carrier rate calculations and cubing. Enter the longest side as the length, the second longest as the width, and the remaining measurement as the height. Include the weight of the packaging in the shipping weight. Full details on how these measurements are used are covered in the Shipping Cubing and Rates section.
Shipping Method
Shipping method controls what kind of shipping will be used for the inventory item. Refer to the Shipping Carriers section for an explanation of how shipping methods work.
Product Dimensions and Weight
Product dimensions and weight record the physical measurements of the item itself, independent of its packaging. These are used for product specification display rather than shipping calculations.
Condition
The condition field offers four options: New, Used, Refurbished, and Damaged. The selected condition is included in shopping feeds so buyers and shopping engines have accurate information about the state of the item.
Create License Key
When set to Yes, Ratals Commerce automatically generates one license key for each unit purchased. This is intended for businesses selling software licenses or access keys, whether for their own software or on behalf of another software vendor using Ratals for billing and fulfillment. Most inventory items will not require this and should be left set to No.
If Create License Key is set to Yes, a separate email containing the customer's license keys is automatically sent after they complete their purchase. This email is sent separately from the order confirmation email. Customers can also view and retrieve their license keys at any time by logging into their customer account portal.
Tax / VAT
Select the tax record that applies to this inventory item. To sell the item without collecting tax, select Do Not Charge Sales Tax. For all other items, select the appropriate tax rate configured in the Sales Tax section above.
Assign Attributes to Inventory
To assign attributes to an inventory item, click Assigned Attributes in the submenu on the inventory page. Here, you can select which attributes apply to the inventory item. Once assigned, the selected attributes will be available on the inventory page, where you can define the values for each attribute.
Assigned Attributes
If attributes have been assigned to the inventory item, they will appear at the bottom of the inventory page. Each assigned attribute will display its available options so you can select the specific value that applies to this item - such as which color it is or which size it represents. These selections are what the product page uses to match customer attribute choices to the correct inventory item and ensure the right item appears on the order. Every attribute assigned to the inventory item will be listed here.
Inventory Variant Builder
The inventory variant builder allows you to create a single template inventory item and use it to automatically generate all variations of that product at once. Rather than creating each variant individually - which can be extremely time-consuming for products with multiple attributes - the variant builder loops through every combination of the attribute values you select and creates each inventory item automatically, assigning them to a product page and category at the same time.
As covered in the Inventory section, using attribute tags like {size}, {color}, and {sleeve_length} in the template inventory name and description will automatically generate unique names and descriptions for each variant as they are created. It is also important that you do not set any attribute values on the template inventory item itself - leave them blank so the variant builder can assign the correct values to each variant as it builds them. The attributes you want variations for do need to be assigned to the template item so they appear in the variant builder for selection.
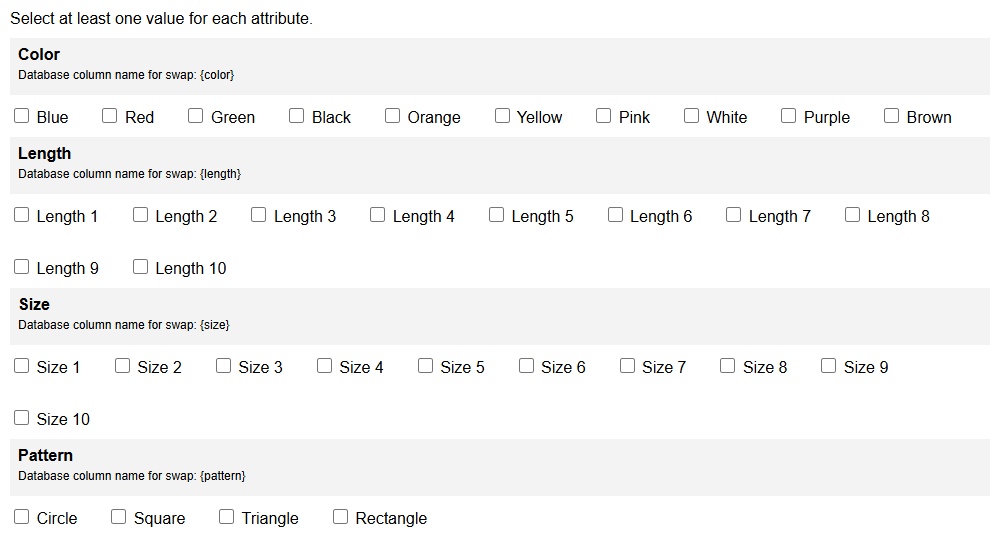
To access the variant builder, open the template inventory item you created and click Variant Builder in the submenu. The builder will prompt you to make three selections before building.
Product to Assign These Variants To
Select the product page you want all variants assigned to. The variant builder will automatically assign every variant it creates to that product, saving you from having to assign them individually after the build. Make sure the product page already exists before using the variant builder.
If the selected product already has inventory assigned to it, that existing inventory will be removed from the product when the new variants are built. This also means that if you want to add more variants to the same product in a second pass, the variants from the first pass will be removed. All attribute values you want on the product should be selected in a single build to avoid this.
Category to Assign These Variants To
Select the category you want all variants added to. The variant builder will automatically populate the selected category with every variant it creates. Unlike the product assignment, adding variants to a category does not remove any existing products or inventory already in that category.
After the build is complete, you can go to the category and drag and drop the display order of the newly added items. To add attribute filters to the category, go to the filter submenu within the category and select which attributes you want customers to be able to filter by.
Select Attribute Values
Choose at least one value for each attribute assigned to the template inventory item. The variant builder will create a unique inventory item for every combination of the values you select.
Assigning to a product and category is optional - if you prefer to assign variants manually after they are built, simply leave the product and category fields empty and the builder will still generate all the inventory items. Once you have selected all the values you want variants for, click Save and the builder will generate them all automatically.
The builder can create over 3,000 inventory items in under 30 seconds. Each variant is assigned a unique item number based on its database row ID, ensuring all item numbers remain unique without any manual entry.
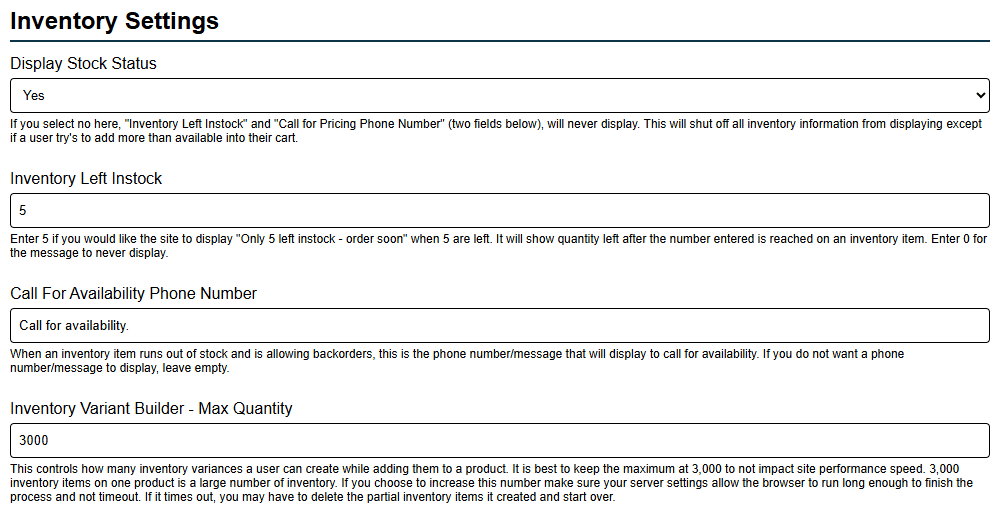
Inventory Settings
Inventory settings provide a small set of controls that determine how inventory information is displayed to customers and how the variant builder behaves across the platform.
Display Stock Status
This setting controls whether any inventory stock information is shown to customers on the storefront. When set to No, the low stock message and call for availability phone number described below will never display, regardless of how those fields are configured. Stock levels will still be enforced at the cart level - customers will not be able to add more units than are available - but no inventory messaging will be visible on product pages.
Inventory Left In Stock
This field sets the threshold at which a low stock message appears on product pages. Entering 5 will display a message such as "Only 5 left in stock" once an inventory item reaches five units remaining, counting down as stock depletes. Entering 0 disables the message entirely so it never displays regardless of stock level. This setting only applies when Display Stock Status is enabled.
Call For Availability Phone Number
When an inventory item is out of stock but has backorders enabled, this field controls the message or phone number displayed to customers in place of normal availability information. This is useful for items where customers may want to confirm lead times or availability before placing a backorder. Leave this field empty if you do not want any message displayed in this situation.
Inventory Variant Builder Maximum Quantity
This setting caps the number of inventory variants that can be created in a single variant builder run. The default maximum of 3,000 is recommended for most setups - generating that many inventory items in one pass is already a significant operation and pushing beyond it can put pressure on server resources and browser timeout limits. If the builder times out mid-run, any partially created inventory items will need to be deleted before starting again. If your server configuration supports longer execution times and you have a specific need to exceed 3,000 variants in a single build, this limit can be adjusted.
Products
Product pages are what give inventory a URL - a publicly accessible page where customers can view and purchase items. Without a product page, inventory exists in the system but has no storefront presence. Product pages are intelligent by design: when an inventory item attached to a product page runs out of stock with no available alternatives, it is automatically hidden on the page.
If all inventory attached to a product page becomes unavailable, the page converts to a lead generation form so customers can still submit a quote request rather than hitting a dead end.
Product Page Fields
Because product pages have their own URLs, all standard fields available on a CMS page are also available on a product page - including SEO metadata, open graph settings, and all other URL-level controls. For a full breakdown of these fields, refer to the SEO section of the Ratals CMS documentation.
In addition to the standard URL fields, product pages include a set of additional fields specific to managing how products are displayed and sold.
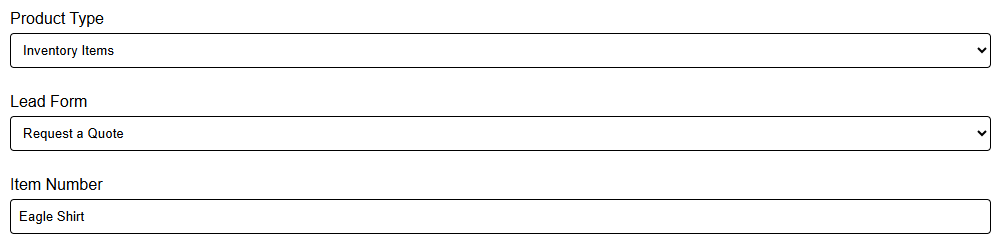
Product Type
Product pages can operate in three different modes, controlled by the Product Type field.
Inventory Items - the standard product page mode where inventory items are attached to the page and drive everything displayed on it. This is the most common setup for selling individual products.
Sub Products - allows multiple product pages built with inventory to be displayed within a single product page. This is useful when selling a collection of related items together, such as a full appliance suite where the refrigerator, range, microwave, and dishwasher are all presented on one page. Customers can set a quantity for each item in the collection and add them all to the cart at once without having to find each item individually. This is an effective way to upsell complete sets or collections.
Lead Form - makes the product page a permanent lead generation form. In this mode, items cannot be added to the cart and customers instead submit a quote request. This is useful for products that require a consultation or custom pricing before purchase.
Lead Form
When the product page is set to Lead Form mode, you can select which lead form displays on the page. Lead forms can be created specifically for individual product pages if needed. To learn more about creating lead forms, refer to the lead form documentation in the Ratals CMS guide.
When running the product page in Inventory Items or Sub Products mode, the lead form selected here also serves as the fallback. If no inventory is available on an Inventory Items page, or if no Sub Products are enabled on a Sub Products page, the lead form is displayed automatically so customers can still interact with the page and submit a quote request.
Item Number
The item number uniquely identifies this product page across the system. As covered in the Inventory section, item numbers must be unique across both inventory items and product pages - the system will prompt you to enter a different number if the one you enter is already in use.
Media Slider
Product pages include a media slider with the same full set of configuration options available on standalone sliders - including the number of slides visible in the viewport, transition speed, lazy loading, high priority loading, and more. For a complete reference of slider settings, see the slider section in the Ratals CMS documentation.
Product Page Submenu
After a product page is created and you return to edit it, a submenu of additional options becomes available. Each submenu section provides further control over the product page and what is displayed on it.
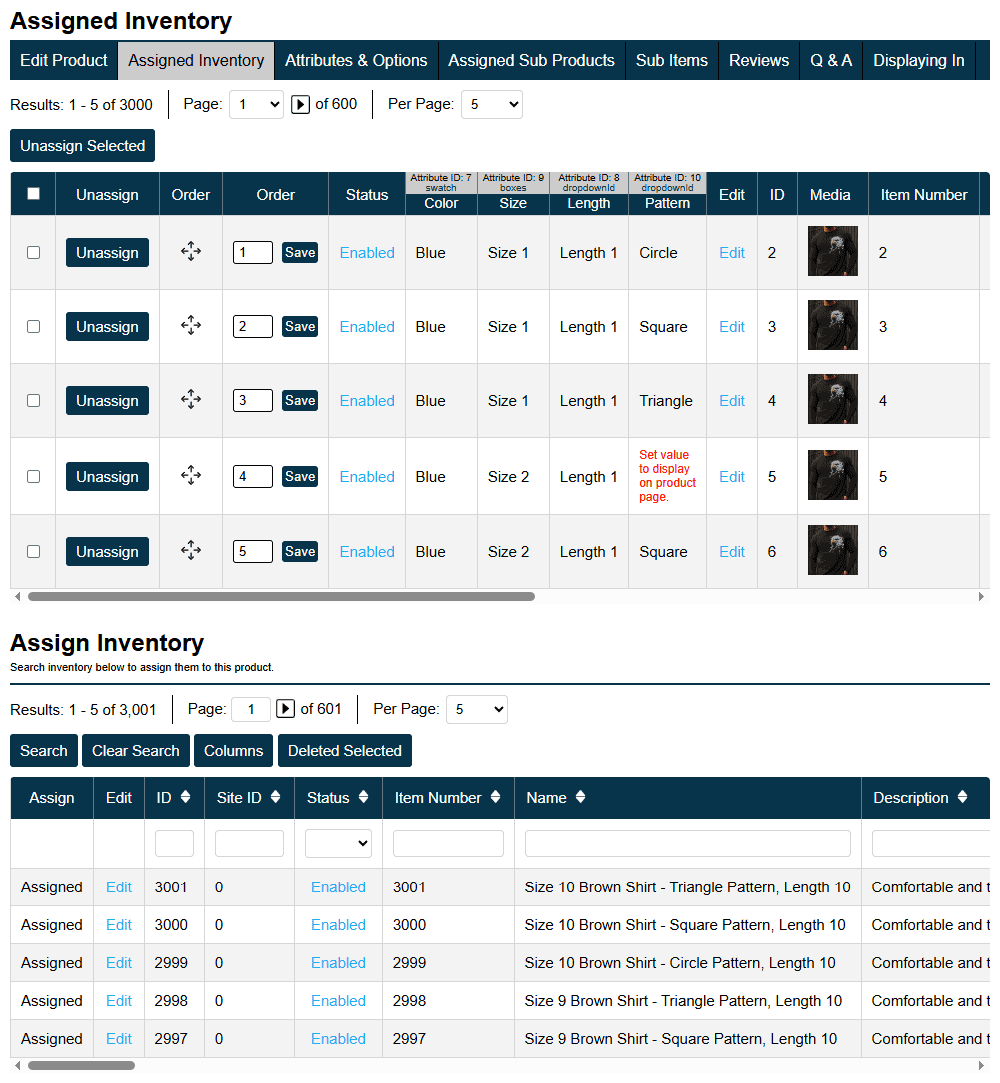
Assigned Inventory
The Assigned Inventory page displays all inventory currently attached to the product page on the top half of the screen, and all inventory available to assign on the bottom half. This split-screen layout allows you to search and assign inventory on the bottom while keeping a clear view of what is already attached on top.
In the top section, assigned inventory items can be reordered by dragging and dropping. The order here controls which inventory item loads as the default selection when the product page is opened, and which item's price is displayed when the product appears in a category listing. Whatever item is in the first position will be the default.
To control the order of attribute options on a product page - such as which color or size appears first - reorder the attribute values within the custom field attribute settings using drag and drop. Keep in mind that the attribute value order applies globally, so changing it will affect every product page that uses that attribute.
If attributes on an assigned inventory item do not match the attributes assigned to the product page, this is where the mismatch will be surfaced. The page will show exactly which inventory items have attributes that do not align with the product page, making it straightforward to identify and correct the issue before it affects what customers see.
Attributes & Options
The Attributes & Options section is where you manage which attributes and options are assigned to the product page. From here you can add, remove, and reorder both attributes and options. If a product page has both a color and a size attribute and you want size to appear first, reorder them here and the product page will reflect that order. The same applies to product options, which are covered in the Product Options section below.
Assigned Sub Products
Assigned Sub Products is where you attach existing product pages, each with its own inventory, to a product page configured to use Sub Products mode. If the Product Type field is set to Sub Products, the products assigned here will drive the page and any inventory assigned through the Assigned Inventory tab will be ignored, and vice versa. Which tab you use depends entirely on which Product Type mode the page is set to.
To control the display order of sub products on the page, drag and drop them into the desired order and the page will load them in that sequence.
All reviews left for the associated product are visible here and can be approved or deleted individually. Only reviews for this specific product page are shown when accessing reviews from within the product page itself.
To manage reviews across all product pages at once, use the interactions section of the admin where all reviews are consolidated in a single view. Pending reviews also appear on the admin dashboard so you can see at a glance what requires attention.
Q & A
Customer questions require more hands-on management than reviews since customers expect a response. When answering a question, two text areas are available. The first is the public answer that will display on the product page so other customers can see both the question and the response. The second is an optional sales message that is sent privately to the customer who asked the question via email - giving your team a way to follow up personally and work the inquiry as a potential sale.
When submitting an answer, you will be asked whether to send an email notification to the customer. The email is formatted with the original question, your public answer, the private sales message if entered, and the signature from the admin user's profile. The reply-to address on the email is pulled from the logged-in admin user's account, so if multiple team members are handling questions, responses will come from the appropriate person. This allows your sales team to simultaneously build product page content through public answers while working individual inquiries privately.
Like reviews, all pending questions across every product page can be managed from the interactions section of the admin or monitored from the dashboard.
Displaying In
This section lists every URL on the site where this product page is currently displayed. Before disabling a product page, this view gives you a clear picture of how many places across the site will be affected by that change. For more information on how Ratals tracks internal linking across the platform, refer to the Internal Linking Intelligence section in the Ratals CMS documentation.
Product Options
Product options are different from inventory attributes. Attributes are tied to inventory and define what an item is - color, size, material, and so on. Options are not tied to inventory at all. They allow you to present an add-on that a customer can select at the time of purchase without it being connected to a physical inventory item.
A good example is a t-shirt offering a gift wrap add-on. The shirt itself is the inventory item, and the add-on is a product option - something the customer can choose to include that does not require its own inventory record or quantity tracking. Options work well for labor, add-on services, customization requests, or anything that does not have physical stock to manage.
If you want to sell two physical products together on the same page, that is not a use case for options - that is when a Sub Products page is the right approach, as covered in the Products section above. Using options for physical products means those items have no inventory valuation, no quantity tracking, and no reporting on what was actually sold as a physical unit.
Creating Product Options
Options are created in the custom fields section of the admin, the same place attributes are created. When creating a new custom field you will be asked whether it is a Content Field, Inventory Attribute, or Product Option. Selecting Product Option enforces that the option is assigned to the products table - just as inventory attributes are enforced to the inventory table - because product options have no function outside of being attached to a product page.
After creating the option, click on the Sub Items column for that option to add the selectable values. You can also add values by clicking Edit on the option and selecting the Sub Items link. This works similarly to adding values to an attribute, with the key distinction that attribute values are tied to inventory records while option values are tied to product pages.
When creating option values, you can enter both a cost and a price. The cost field is an internal reference - an estimate of what it costs you to provide that option - which appears on orders to give you a rough margin reference. The price field is what the customer is charged when they select that option. The option price is added to the inventory item price and displayed as a subtotal in the cart so customers can clearly see what has been added to their order.
Assigning Options to a Product Page
Once an option and its values have been created, they can be assigned to any product page. Open the product page, click Attributes & Options in the submenu, then click Manage Options. All options created in the system will be listed here. Select the option you want to add and it will be assigned to the product page. Options always display below attributes on the storefront product page because attributes define what the customer is purchasing while options are purely an add-on to that selection.
Once the option has been assigned to the product page, it will appear on the storefront where customers can make their selection before adding the product to their cart.
A Note on Using Options Instead of Attributes
It is possible to run an entire store using options instead of attributes - creating one inventory item per product and using options to represent all variants. This can feel simpler to manage early on since there are fewer inventory records to maintain. However, it comes with significant limitations as a business grows.
When variants are handled through options rather than inventory items, there is no inventory valuation, no quantity tracking per variant, and no reliable reporting on what was sold, what is in stock, or what is performing. What starts as a simple setup can become a significant problem to untangle if the business grows and real inventory management becomes necessary.
Because Ratals Commerce is a business-first platform, we recommend being deliberate about when options are the right tool. Options are appropriate for genuine add-ons and services - things that are not physical inventory. If you ever plan to upgrade to Ratals ERP, real accounting and inventory valuation require real inventory records. Options cannot substitute for that.
Product Categories
Product categories give customers a way to browse and discover the products you sell. After creating inventory and attaching it to product pages, categories are where those products become discoverable at scale. For very small stores with only a few products, displaying items directly on the homepage may be sufficient - but as your catalog grows, categories become the primary way customers navigate your store.
Setting up a category follows the same pattern as creating any other URL in Ratals. Categories use the same URL structure and fields as CMS pages, posts, and product pages - giving you full SEO control including meta titles, descriptions, canonicals, and custom URL structures. Beyond the standard URL fields, categories include additional settings to control filters, pagination, grid layout, and display behavior, all of which are covered in this section.
Category Template
The template you assign to a category determines how it behaves. The categories-store.php template runs the category as a store, enabling inventory filters, grid layouts, and product display. The categories-blog.php template runs it as a blog category, loading posts assigned to that category. Choosing the correct template when creating a category is important, but it is not permanent - if you ever need to switch a blog category to a store category or vice versa, simply change the template and assign the appropriate content. Ratals is flexible enough that this kind of change requires no development work.
Number of Products
This setting controls how many results are displayed per page - commonly referred to as pagination. Setting it to 30 will show 30 results per page, 50 will show 50, and so on.
Pagination can be managed at the category level or set globally in the admin under Website > Site Settings > General Settings. The global default is 30 results per page. If you want most categories to show a different number, update the global setting rather than setting each category individually. If a specific category needs a different number from the global default, set it at the category level - category-level settings always take priority over global settings throughout Ratals.
Display Filters
This is the master on/off switch for attribute filters within the category. Even if filters have been configured in the filters submenu, they will not display unless this setting is enabled on the category. Both this setting and the filters submenu must be configured for filters to appear.
Display Blog Posts
This setting applies when the category is running the blog template. It controls whether the blog roll of posts assigned to the category is displayed. When using the store category template, this setting has no effect. For blog categories, turning this off allows you to design a fully customized blog category page using the blog template without automatically displaying the standard post roll.
Display Category Link in Blog Sidebar
When using the blog category template, this setting controls whether the category appears in the blog sidebar navigation. Enabling it adds the category to the sidebar so visitors can navigate between blog categories. Because this is controlled per category, you can choose exactly which categories appear in the sidebar and which do not - giving you full control over your blog navigation without being forced to display every category.
Blog Sidebar Link Order
If a category is set to display in the blog sidebar, this field sets its position in the sidebar list. Assign an order number to each category you want displayed, and they will appear in that order. This makes it straightforward to control the sequence of blog categories in the sidebar without any template editing.
If you prefer to manage your blog sidebar categories using a custom menu, Ratals makes that easy as well. Simply create a menu, add the desired menu items, and copy the menu code from the Edit Menu page. Then navigate to Websites > Templates > Default > sidebar-blog-categories.php and paste the menu code into the template wherever you want the menu to appear within that html.
This is just one example of how easy Ratals is to customize. Nearly every aspect of your website can be modified directly from the admin area without being locked into a rigid theme or template structure.
Grid Columns
Grid columns control the layout of both store and blog category templates. For store categories, setting grid columns to 2 produces large images displayed two per row, while setting it to 5 or 6 produces smaller images in a denser grid as shown above. Selecting 1 - List View switches the layout so each product occupies its own full-width row as show below, which is useful for catalogs where descriptions and details are more important than large images. For blog categories, the same logic applies, allowing you to adjust the post layout with a single setting and no development work required.
Category Submenu
After a category has been created and you return to edit it, a submenu of additional options becomes available. This is the same pattern used throughout Ratals - the submenu for managing deeper settings appears after the core record exists.
Edit Category
Returns you to the main category settings page. If you have navigated to another submenu item and need to get back to editing the category itself, click Edit Category.
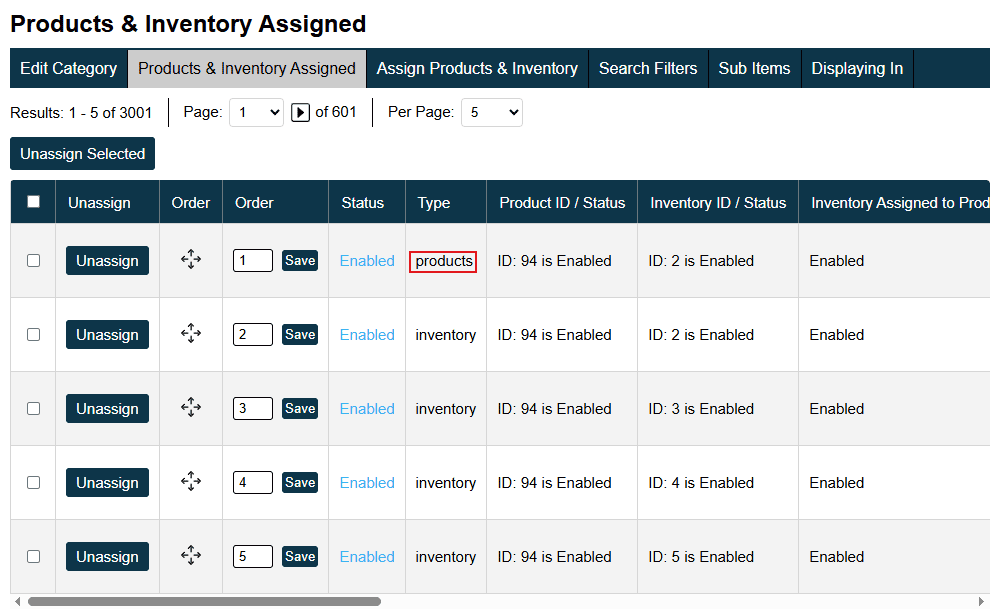
Products & Inventory Assigned
This is the dedicated page for managing which products and inventory items are displayed within a category. Ratals categories are built to handle large catalogs without performance impact - categories with over 10,000 products have been tested and still load in approximately 400 milliseconds with caching off.
Because categories can grow to hold thousands of items, ordering works slightly differently here. Drag and drop is available for reordering, but you can also enter a specific position number for any item and it will shift everything else to place it in that spot. This makes managing large categories practical without having to drag items across hundreds of rows.
Assign Products & Inventory
Product categories can hold product pages, individual inventory items, or a mix of both - giving you complete flexibility in how a category is built out.
When assigning products and inventory to a product category, product pages are shown first. This makes it easy to find what you need without having to sift through every inventory item behind every product. Once you find the product page you want, you can add just the product page, click to assign all inventory items behind it at once, or choose specific inventory items from those attached to it. Between this bulk assignment feature and the inventory variant builder, populating a category with thousands of items can be done in minutes rather than hours.
After assigning everything, return to Products & Inventory Assigned to set the display order. A common approach is to place core product pages at the front of the category and push individual inventory variants to deeper pagination pages - keeping the browsing experience clean while still making every variant discoverable.
Search Filters
Search filters let you choose which attributes customers can use to filter the category. Because attributes are tied to inventory, filters only work when inventory items are assigned to the category - a category populated entirely with product pages will have no attributes available to filter by.
The filter selection is intelligent. Only attributes that are actually assigned to inventory within that category will appear as options when configuring filters. This prevents you from adding filters that would return no results, and as your category grows it makes it easy to see exactly what can be filtered based on what is in it.
This section lists every URL on the site where this category page is currently displayed. Before disabling a category, this view gives you a clear picture of how many places across the site will be affected. For more information on how Ratals tracks internal linking across the platform, refer to the Internal Linking Intelligence section in the Ratals CMS documentation.
Cart Settings
Cart settings control how the shopping cart behaves for customers - from how many units can be purchased per line item to whether discount codes are visible and where customers land after adding an item to their cart. These settings are straightforward but have a direct impact on the checkout experience and conversion flow.
Cart Line Item Max Quantity
This setting controls the maximum number of units a customer can add to their cart for a single inventory item. The default maximum is 9,999. If your business model requires limiting how many units a customer can purchase at once - for example, limiting bulk purchases or protecting stock during high-demand periods - you can reduce this number here. It can also be increased beyond the default if needed.
Display Discount Code on Cart
This setting controls whether the discount code entry field is visible on the cart page. If you offer discount codes to customers, set this to Yes so they can enter and apply them before checkout. If you do not use discount codes, setting this to No keeps the cart clean and removes a field that would otherwise prompt customers to leave the page in search of a code they do not have.
Redirect to Cart After Adding Item to Cart
When a customer adds an item to their cart, this setting determines what happens next. Set to Yes, the customer is redirected to the cart page immediately after adding an item. Set to No, the customer stays on the product page and receives a confirmation message letting them know the item was added. Which option works best depends on your store's checkout flow - redirecting to the cart works well for stores where customers typically buy one item at a time, while staying on the product page is better for stores where customers are likely to continue browsing and adding multiple items before checking out.
Checkout Settings
Checkout settings control how customers move through the purchasing process - from whether they need an account to check out, to how payment information is handled, to where customers land after placing an order.
Allow Customers to Checkout as Guest
Controls whether customers must create an account before completing a purchase. Set to Yes, customers can check out without an account, reducing friction and generally improving conversion rates. Set to No, an account is required before checkout can be completed - useful for businesses that want to build a customer database or require account access for post-purchase support and order management.
When guest checkout is enabled, customers can still create an account after placing their order to access order history. Previous guest orders can be manually associated with the new account once it exists. Always verify the customer's identity before linking any orders to their account.
Note: This setting is automatically overridden when the cart contains one or more recurring subscription items. Subscriptions require an account so customers can manage billing, update payment methods, and view order history. When Ratals Commerce detects a recurring item in the cart, account creation is required before checkout can be completed.
Allow Customers to Save Debit and Credit Cards in Their Account
Controls whether customers can save payment cards to their account for faster checkout on future orders. When set to No, card saving is disabled - any customer account menu links and pages related to saved cards should also be disabled so customers are not shown options that are unavailable to them.
Card on file functionality currently works with Authorize.net. Additional payment gateways are planned for a future release.
Note: If you enable the option to let customers save cards, make sure at least one gateway that supports Card on File, such as Authorize.net, is enabled - otherwise customers won't have anywhere to save the card.
Ratals does not store card numbers or security codes. When a customer saves a card, Ratals creates a customer profile with Authorize.net and submits the card directly to them. Authorize.net returns a customer profile ID and payment profile ID, which Ratals stores in place of the card data. When a saved card is used at checkout, those IDs are passed to Authorize.net to process the charge - the card number itself never passes through or is stored in the Ratals database.
Customer Account URL
The URL where customers log into their account. Ratals references this URL in account creation emails, cart login prompts, and other communications that direct customers to their account. If the customer account page URL ever changes, update this field at the same time to keep all references accurate.
Order Confirmation URL
The URL customers are redirected to after successfully placing an order. Unlike other pages on your site, the order confirmation page is not linked to from anywhere - Ratals needs this URL configured so it knows where to send customers once checkout completes. If you ever change the confirmation page URL, update this field to match.
Gateway Settings
Gateway settings is where you configure the payment methods your store accepts. Ratals Commerce includes built-in support for several payment methods out of the box, and custom gateway connections can be added with development work for processors not already supported. When setting up a gateway, you will select the currency the gateway processes funds in, which countries can use it, and which card types to accept - Visa, Mastercard, Discover, American Express, and others depending on what your processor supports. All gateways you've configured are listed on the main Gateway Settings page in a table view:
Built-In Payment Methods
Authorize.net
Authorize.net is fully integrated into Ratals Commerce for accepting card payments. If your credit card processor works with Authorize.net, you can accept cards, allow customers to save cards for future checkouts, and manage the full checkout flow from day one - no development work required. To get started, create a new gateway record in the admin, select Authorize.net as the gateway type, and enter the API credentials provided by Authorize.net. Your store will be ready to accept card payments within minutes.
PayPal
PayPal is fully integrated into Ratals Commerce for both one-time purchases and recurring subscription billing. To set it up, create a new gateway record, select PayPal as the gateway type, and enter your PayPal credentials. A full webhook is built in to receive and verify payment confirmations directly from PayPal, ensuring the platform can confirm a payment has been made before an order is processed.
Check by Mail
Check by Mail allows customers to submit an order without paying at checkout. The order is created and flagged as unpaid, pending receipt of the check. When setting up this gateway, you can enter custom payment instructions and any policies you want customers to see at checkout. Once the order is submitted, the confirmation email and customer account will both reflect that the order is waiting on check payment before fulfillment begins.
Venmo and QR Code Payments
Because the Check by Mail gateway allows custom payment instructions, it can also be used for Venmo, Cash App, or any other QR code-based payment method. Simply name the gateway after the payment method, enter your payment instructions, and include your QR code image so customers can scan and pay. Orders are held as unpaid until you confirm receipt of the payment and match it to the order manually.
Custom Payment Gateway APIs
If you need to connect a payment processor not already built into Ratals Commerce, custom gateway integrations are supported with development work. Because every gateway formats its requests and responses differently, the connection requires code specific to that processor - handling how the charge request is sent and how the response is parsed and passed back to the order record.
If your processor works with Authorize.net, that is the fastest path to accepting card payments without any custom development.
Shipping Settings
Shipping settings control how shipping is calculated and displayed throughout your store - from distance-based carrier quoting to unit preferences used across inventory, orders, and fulfillment.
Free Shipping
When enabled, free shipping is applied automatically at checkout based on the cart subtotal minimum configured below. Set the minimum to 0.00 to offer free shipping on all orders, or enter a specific amount - such as 199.00 - to apply free shipping only when the cart reaches that threshold.
Free Shipping Cart Subtotal Minimum
Sets the minimum cart subtotal a customer must reach to qualify for free shipping. This field is only active when Free Shipping is enabled. Enter the threshold amount and Ratals Commerce will apply free shipping automatically when the cart meets or exceeds that value.
Calculate Shipping Distance Based on State or Postal Code
Controls whether shipping center proximity is calculated using state-level or postal code-level coordinates. By default, Ratals Commerce uses state-level matching and comes pre-loaded with coordinates for all 50 US states - ready to use without any additional configuration. If you need postal code-level precision, add the appropriate coordinates in the Latitudes & Longitudes section for each postal code within the countries you ship to, then set this option to Postal Code. For a full explanation of how these coordinates are used, refer to the Latitudes & Longitudes section earlier in this guide.
Unit of Measure
Determines how product dimensions are entered throughout the platform - inventory records, orders, shipping calculations, and volume-based landed cost. Select Inches for imperial regions such as the US or Canada. Select Centimeters for metric regions.
Unit of Weight
Determines how product weight is entered throughout the platform - inventory records, shipping calculations, and weight-based landed cost allocation. Select Pounds for imperial regions such as the US or Canada. Select Kilograms for metric regions.
Shipping Cubing and Rates
Shipping is one of the most common places online stores lose margin - either by overcharging customers and hurting conversion, or by undercharging and absorbing the difference. Ratals Commerce solves this by ensuring the rate your customer pays at checkout reflects what you will actually be charged to ship it.
It does this by cubing every order before a rate request is ever sent to a carrier - calculating exactly how many boxes or pallets a shipment requires based on the dimensions set on each inventory item. The result is a precise rate request, not an estimate. Whether a customer orders a single small package or enough product to fill several pallets, cubing and carrier allocation are handled automatically across all of your shipping center locations.
Initial Setup
Shipping cubing requires at least one carrier to be configured in the Shipping Carriers section before rates can be returned at checkout. With one parcel carrier configured - such as UPS or USPS - the cubed shipment dimensions and weight are sent to that carrier for a rate quote. With two parcel carriers configured, both receive the request and the lowest rate is returned to the customer. If orders can exceed parcel carrier weight limits, T-Force should also be configured to handle LTL and freight shipments.
How Cubing Works
Cubing uses the shipping dimensions and weight entered on each inventory item to calculate how an order will be packed. Within each carrier setup, you define the maximum box size that carrier can ship. Ratals Commerce uses that maximum to pack items into boxes - when a box reaches capacity based on the configured dimensions, it is closed and a new box begins. This process runs before any rate request is sent, so carriers receive the exact dimensions and weight of every box in the shipment.
When an individual item is larger than your configured maximum box size, it is quoted as its own box rather than cubed with other items. When an item qualifies for overlength charges, those flags are submitted to the carrier automatically so the correct surcharges are applied to the rate.
For orders that exceed parcel carrier weight limits - USPS has a maximum of 70 pounds per box, UPS has a maximum of 150 pounds per box - T-Force can be configured to handle LTL and freight shipments. When a weight threshold you define is exceeded, Ratals Commerce automatically requests a freight rate from T-Force alongside any parcel rates, and the lowest rate across all carriers is displayed to the customer. If your catalog will never produce a single inventory item that exceeds your parcel carrier weight limits, LTL configuration is not required. When you're logged into the admin, you can see exactly how the shipping quote was calculated directly in the cart — this is hidden from customers, giving you the flexibility to ship it however works best for you.
Custom Shipping Carrier API Connection
If you need to connect a carrier not already supported in Ratals Commerce, a custom API connection can be built to request rates from that carrier and display them at checkout. Returned rates are passed to the order record so shipping costs are reflected accurately across all records.
Orders
Every order placed through Ratals Commerce - whether a one-time transaction or a recurring subscription - appears in a single order management area in the admin. Each order record contains customer information, shipping and billing details, inventory ordered, warehouse allocation, and payment records. When running Ratals ERP, journal entries are created automatically when an order is placed, eliminating manual accounting entries entirely.
Orders
The main orders screen displays all orders alongside their current status - both the internal workflow status visible to your team and the customer-facing status visible in their account. Whether you are a solo operator handling every step yourself or a larger team routing orders through multiple departments, the orders screen is designed to make it clear what needs attention and what is already in motion.
Order Details
Opening an order brings you to the order detail screen - a single snapshot of everything about that order. Individual submenu screens provide deeper access to each component, but the main order screen gives you a complete overview at a glance without having to navigate between sections.
Edit Order Details
The Edit Order Details screen is the first item in the order submenu and provides access to the core fields that define the order record. From here you can manage the following:
Customer Account ID - assign or reassign the order to any customer account in the system.
Order Status - control both the internal workflow status and what the customer sees in their account.
Referrer Source - see where the order originated. For online orders this shows the referring traffic source; for orders placed by a logged-in administrator, this instead shows which team member created the order.
Salesperson Account ID - assigns the order to the salesperson who owns the customer relationship, regardless of who or what channel actually placed the order. This lets online orders be attributed to the salesperson managing that account after the fact, even though Source will show the order came in online.
Journal Group Number - the journal group tied to this order, making it straightforward to locate and adjust the related accounting entries months or years later if needed.
Affiliate Account ID - if an affiliate referred the order, their account ID, commission percentage, and commission amount owed are recorded here.
Order Total and Amount Paid - the full order value and what has been collected against it.
Accounts Receivable - if the order was placed on credit, the outstanding balance and payment due date are displayed here.
Invoice Notes - notes entered here will appear on the downloadable invoice for the customer to see.
Receipt Notes - notes entered here will appear on the receipt when the order has been paid in full. Invoice and receipt notes are separate fields so each document can carry its own messaging.
Internal Notes - general notes for internal use, giving anyone managing the order a record of any changes made or communication with the customer.
Customer Information
The Customer Information screen allows you to edit the customer's personal details on the order - name, company name, email address, and phone number.
Shipping Information
The Shipping Information screen allows you to update the shipping address on an order. If an address issue needs to be corrected before fulfillment, this is where that change is made.
Billing Information
The Billing Information screen displays the billing address the customer submitted at checkout along with the payment gateway used, the last four digits of the card, and the transaction approval ID returned by the gateway.
Inventory Ordered
The Inventory Ordered screen allows you to add, edit, or remove items on an order before payment has been collected. Once payment is taken, individual line items can still be canceled if needed. Canceling a line item triggers a structured reversal - the refund is processed back to the original payment method, a reversing journal entry is posted when running Ratals ERP, warehouse allocation is adjusted, and the order total and tax collected are updated to reflect the change. The rest of the order remains intact and continues through fulfillment normally. If the entire order needs to be canceled, that can be done from the order record as well.
Warehouse Allocation
Warehouse allocation is where you manage which shipping centers will fulfill each inventory item on the order. When an order is placed, Ratals Commerce automatically allocates quantities to the closest shipping centers with available stock, reserving those units for the order so they are not oversold.
If allocation needs to be moved to a different location, you can unallocate the quantities and reallocate them to any other shipping center. The screen shows how many units need to be allocated, how many have been allocated, and which shipping centers they are allocated to.
When running Ratals ERP, orders can also be allocated to incoming purchase orders that have not yet been received. When that inventory arrives and is received into the system, the allocation automatically converts from PO-allocated to on-hand and allocated - signaling to your warehouse that those units are ready to ship immediately upon arrival.
Once an order ships, tracking numbers can be entered directly on the allocation screen. Partial shipments are supported - you can ship and enter tracking for only the quantities currently in stock and handle the remainder when it arrives. Once tracking numbers are entered, a shipping confirmation email can be sent to the customer directly from the admin. If you quoted shipping via UPS but shipped via USPS, simply update the carrier name and enter the correct tracking number so the customer's tracking link works accurately.
If all items on the order are digital products or services that require no physical shipment, the warehouse allocation screen will not be applicable and nothing will need to be done there.
Shipping Cubing
If any items on the order used carrier-calculated shipping, the Shipping Cubing screen shows exactly how those items were cubed into packages before rates were requested. This gives you a complete record of why the customer was quoted the shipping rate they paid, with no guesswork. If your warehouse packs and ships the order to match the cubing on record, the rate you are billed by the carrier will match what the customer paid.
Download / Print Invoice
When a customer still has a balance due, the invoice is the appropriate document to send. Invoices can be downloaded and attached to an email or printed directly from this screen. Any invoice notes added on the Edit Order Details screen will appear on the invoice.
Download / Print Receipt
Once an order has been paid in full, a receipt can be generated and sent to the customer confirming the completed transaction. Receipts can be downloaded and emailed or printed the same way as invoices. Receipt notes are managed separately from invoice notes on the Edit Order Details screen, so each document can carry its own messaging.
The level of detail available on a Ratals Commerce order record goes well beyond what most ecommerce platforms provide. Because Ratals is built in tiers and data entered at each level carries forward into the next, every order becomes a complete operational record - one that flows directly into ERP accounting, purchasing, and reporting when the full Ratals platform is in use.
eCommerce Analytics
Analytics is the first thing admin users see when they log in - and that is intentional. Understanding how many orders came in, where revenue stands, and why performance looks the way it does should not require digging through reports. Ratals Commerce analytics are designed to answer those questions at a glance the moment you open the admin.
When running Ratals CMS, analytics focus on traffic and content performance. When you upgrade to Ratals Commerce, financial and transactional data is layered in alongside the existing traffic reports - giving you a complete picture of not just who is visiting, but what they are buying and what it is worth.
Ratals Commerce Dashboard
The Commerce dashboard introduces a set of additional columns that give you immediate insight into how your business is performing for any time period selected. These columns are:
Orders - The number of orders received for the selected time period.
Conversion Rate - Unique visitors compared to orders, showing what percentage of visitors are converting into customers. If conversion looks low for a given period, click the checkbox for sources to identify which channel has stopped converting as well as it used to.
Products - Total product revenue from orders for the selected time period.
Shipping - Total shipping revenue collected for the selected time period.
Tax - Total tax and VAT collected for the selected time period.
Discounts - Total discount value applied across all orders where a coupon code was used.
Order Total (Tax Not Included) - Order revenue excluding tax, since tax is passed on to the tax authority and does not factor into profit.
Order Landed Cost - What the products on those orders actually cost you at landed cost, giving analytics a true cost figure to calculate profit against.
Order Profit / Margin - The actual profit amount and margin percentage on orders for the selected date range.
Average Order - Your average order value across all orders for the selected date range.
Having these numbers together in one view makes it fast to understand exactly why revenue looks the way it does at any point in time. If revenue is down, you can see immediately whether the cause is lower traffic, a drop in conversion rate, or a lower average order value - three very different problems that require three very different responses. If revenue is up, you can see exactly which of those levers is driving it. Ratals analytics are built around three core questions that tell the story of any business:
Traffic - Has the volume of opportunity been high or low for the selected period?
Conversion - Is the store converting that opportunity into customers at a healthy rate?
Revenue - Is each order generating the right amount of product revenue for the business to grow?
Knowing the answer to all three at a glance tells you immediately where to focus and where things are working.
Sales Team Analytics
Beyond the three core metrics above, the Source column offers another lens on your data - it does more than track third-party referrers. If your business has a sales team that enters orders over the phone or in person, any order created while an administrator is logged in has its Source automatically populated with that administrator's name instead of a referrer. This means the same column tracks both where your online traffic is coming from and which team member is responsible for orders entered manually. Selecting the Source checkbox displays this column and lets you instantly compare performance across salespeople for any date range - showing who is driving revenue, who may need additional coaching, and how each team member is contributing to overall business performance.
Unique Visitors
The Unique Visitors total on the dashboard is a link that drills down into a full visitor report. Every visitor is tracked and segmented individually from their first visit through every return visit - whether that is a real customer or a bot. Bots almost always request the robots.txt file early in their session, making them straightforward to identify within the report. Nothing is hidden or filtered out, giving you a complete and unfiltered view of everything hitting your site.
The report shows each visitor's full click path from their first touch to their last, even when that first visit happened weeks earlier. If your average conversion window is two weeks and visitors are returning four times before purchasing, you will see that pattern clearly. This tells you exactly what pages customers need to visit before they convert, how long your conversion window actually is, and which traffic source originally introduced them to your store - information that most analytics platforms either aggregate away or lose entirely.
The Counts by URLs view within this report surfaces which landing pages are causing visitors to bounce immediately, along with the traffic source behind those bounces. If one traffic source converts well on a given URL and another does not, you have the data to investigate the underperforming source rather than guessing at what is wrong.
Pageviews
The Pageviews total on the dashboard is also a link, drilling down into a report showing which pages on your site receive the most traffic. If the pages driving the most visits are not part of your conversion flow, that is a signal worth acting on - it may point to link restructuring or content adjustments needed to move more visitors toward the pages that actually convert.
Ratals analytics are not built to give you numbers - they are built to give you answers. Every report is designed to surface the story behind the data so you know what is happening, why it is happening, and what to do about it.
Note: Analytics can be enabled or disabled in the admin at Website > Site Settings > General Settings. If disabled, tracking will stop collecting traffic and order conversion data. If you run an affiliate program as described below, be aware that affiliate traffic data is pulled from the analytics table - affiliates will still see all their orders and leads, but will no longer see how much traffic they have sent to your site. If you want to use a third-party analytics platform such as Google Analytics or Bing, you can configure that in the General Settings section of the admin by entering your analytics account number - Ratals Commerce will automatically tag everything, including conversion values.
Customer Account Management
The admin side of customer account management gives you full visibility and control over every customer account in the system - from creating accounts and managing addresses to viewing subscriptions, handling licenses, and configuring automated email workflows.
All Customer Accounts
The customer accounts list displays every account ever created in the system. Like other table views in Ratals, columns can be reordered by dragging and dropping and rows can be sorted to match your preferred view. Shipping address data is included in the search, which makes it easy to look up a customer by where an order was shipped - useful when a customer calls in for support and does not have their order number handy. Searching by shipping address pulls up the associated order details directly.
New customer accounts can be created directly from the admin without going through the storefront. If you are on Ratals ERP, these same customer accounts carry forward into the ERP customer records - no separate setup required.
Addresses
Both customers and admin users can add addresses to an account. From the admin, you have full control to view, add, and edit any address on any account. If you are taking an order over the phone and want to set up the customer's shipping address before placing the order, you can create the account and add the address entirely from the admin without the customer needing to go through the storefront checkout flow.
Cards on File
Saved payment cards cannot be viewed or managed from the admin area, and this is intentional. Saving a card to an account is an action the customer should take themselves - not something a business owner or operator should do on their behalf. If you create an account for a customer and they want to save a card, they should log into their account and do it themselves. This keeps card management fully in the hands of the customer where it belongs.
Orders
After creating a customer account and adding an address, if a customer wants you to place an order on their behalf you can log into their account directly from the admin and add items to their cart. You can then take their card details over the phone to complete the order - giving the customer a record of that order in their account when they log in later.
When placing an order on behalf of a customer, do not save the card to their account. That decision belongs to the customer. For full details on managing orders once they are placed, refer to the Orders section of this guide.
Subscriptions
All subscriptions - active or inactive - are listed in the subscriptions table view with the same drag-and-drop column ordering and sorting available throughout the admin. Subscriptions are tied to customer accounts by customer account ID. To see all subscriptions for a specific customer, use their account ID. If you only have an order number from the original subscription or the last renewal, you can look up that specific subscription by order number - though this will return only that single record rather than all subscriptions under the account.
From the subscription record you can manage the subscription status - activating or canceling it to stop future billing. When a subscription renews, current shipping rates are pulled from the assigned shipping centers and a full order is created automatically so your warehouse knows to fulfill it. Tax rates configured at the time the subscription was created are also saved to the subscription and applied at renewal. Once set up, subscription renewals are largely hands-off - a new order appears and the warehouse ships it.
Subscription records display the last billed date, next billed date, last failed attempt, number of failed billing attempts, and more. The Subscription Settings submenu controls how the system handles failed billing - including how many failed attempts to allow before auto-canceling, whether to notify the customer on failure or success, how many days to wait between retry attempts, and whether customers can cancel their own subscriptions from their account or must contact you to do so. If you use addon unit billing, the label and per-unit price are also configured here.
Note: When a subscription is created, current inventory pricing is saved to the subscription record and used for all future renewals. If you need to update the price on an existing subscription, it must be updated on each subscription record individually. PayPal subscriptions are an exception - PayPal treats a subscription as a fixed contract and does not allow price changes, so the customer must cancel their current subscription and create a new one at the updated price.
Subscriptions require a cron job to run the billing and order creation script on the configured interval. Full setup instructions are available here.
Licenses
If any inventory items are configured to generate license keys, every license created across all orders is accessible from the admin. When a license key is tied to a recurring subscription, the license status is managed automatically alongside the subscription - if the subscription is canceled or fails to bill, the license is disabled. If billing is later resolved and the subscription becomes active again, the license is re-enabled automatically. This makes Ratals a complete solution for businesses managing software licenses or any access-controlled product that requires valid subscription status to remain active.
Cart Recovery Emails
When a visitor adds items to their cart and enters their details for a shipping or tax quote, that information is saved as an abandoned cart lead. Ratals Commerce can automatically follow up with that visitor and bring them back to their saved cart, giving you a complete cart recovery workflow without requiring a third-party service.
You can configure up to three recovery emails, with individual controls for each email's status, subject, message, and send delay. This lets you decide exactly when each reminder should go out - whether that is a few hours after the cart is abandoned, the next day, a week later, or any schedule that fits your business. Recovery emails are sent through the Ratals SMTP mailer using your authenticated email account, and an unsubscribe link can be included so recipients can opt out of future cart recovery emails.
Cart recovery emails are processed automatically through a cron job. For complete configuration, email template, timing, unsubscribe, and cron setup instructions, view the Cart Recovery Emails documentation.
Review Request Emails
After an order ships, Ratals Commerce can automatically follow up with the customer and ask them to review the products they purchased. You can configure up to three review request emails, with individual controls for each email's status, subject, message, and send delay. This gives you complete control over how long you wait for delivery and when each follow-up request is sent.
Review request emails are sent through the Ratals SMTP mailer and processed automatically through a cron job. An unsubscribe link can be included so customers can opt out of future review request emails. Reviews submitted through these requests are displayed directly on product pages with review structured data for search engines and AI agents after they are approved by an admin user. For complete configuration, email template, timing, unsubscribe, and cron setup instructions, view the Review Request Emails documentation.
When the customer follows the review link, Ratals Commerce provides a simple review interface containing the products from their order. Whether the order contains one product or many, the customer can move through their purchase and review each product they choose from the same page, making it easy to provide feedback without searching for individual product pages.
Bulk Email and Customer Export
All customer records can be exported from the admin in minutes. From the export area, select the customer table and download the full list - then remove any columns you do not need and upload the names and email addresses directly into your email marketing platform of choice. This approach gives you the flexibility to use whichever platform fits your business without being locked into a built-in integration.
Broadcast email to your full customer list is intentionally kept outside of Ratals. Sending bulk email from your own domain without proper email marketing infrastructure in place is one of the fastest ways to get your domain blacklisted - which would affect not just your marketing email but every transactional email your store sends. Dedicated email marketing platforms handle sending infrastructure, unsubscribe compliance, and deliverability on a separate domain and system, keeping your store's email reputation intact.
Customer Account Portal
The customer account portal is where customers log in to manage everything related to their account - from viewing order status and tracking shipments to managing subscriptions, license keys, saved addresses, and payment cards. Every section of the portal is optional and can be enabled or disabled from the admin to match exactly what your store offers.
Orders
The orders screen is the first thing customers see when they log in. It displays every order placed on their account in a table view - including recurring subscription orders generated automatically at renewal. Each row shows the order number, status, order date, order amount, ship date where applicable, a link to view the full order details, and a link to download either an invoice or a receipt depending on whether a balance is still outstanding.
Clicking View Order takes the customer to the full order detail screen where they can see every item purchased, quantities, and shipment status. If the order has shipped, tracking numbers are displayed as links to the carrier's site so customers can follow the shipment in real time. If the order shipped in multiple parcels, every tracking number entered on the warehouse allocation screen in the admin is displayed here.
Items purchased as recurring subscriptions are identified as such on the order so customers can distinguish them from one-time purchases. Every line item also links back to the product page it was purchased from, making it easy for customers to reorder directly from their order history.
Address Book
Customers can save as many addresses to their account as they need, making it faster to check out across multiple shipping destinations, service locations, or billing scenarios without re-entering information each time.
On the cart page, saved addresses can be selected to update where an order ships, where a service is performed, or where tax should be calculated - depending on what is in the cart.
The customer address section is labeled Addresses rather than Shipping Addresses intentionally. The cart is context-aware: if only digital items are in the cart, it asks for an address to calculate tax. If service items are in the cart, it asks for the service location. If physical goods are in the cart, it asks for the shipping address. The cart determines which context applies automatically based on the inventory types present, giving customers a checkout experience that matches what they are actually buying.
If you want to update the label or messaging the cart displays for each inventory type, that can be adjusted in the cart template within the admin.
Cards on File
Saved cards give customers a faster checkout experience on return visits. Cards can be added from within the account portal or during checkout, and any card added is immediately available for future use. If a customer has active subscriptions, any card tied to an active subscription cannot be removed until the subscription is canceled or a different card has been assigned to it.
Ratals does not store card numbers in its database. When a card is saved, it is submitted directly to Authorize.net, which returns a customer profile ID and payment profile ID. Those IDs are what Ratals stores and uses to process future charges - the card number itself never touches the Ratals database.
Subscriptions
The subscriptions screen lists every subscription tied to the customer's account. Each row displays the subscription name, quantity, unit price, add-on unit details if applicable, and the combined total for the subscription and any add-on charges. If no add-on unit pricing is configured, those columns are hidden automatically to keep the view clean.
Customers can also see the last billed date, next billing date, and their current payment method for each subscription. If they are paying by card on file, they can switch between saved cards to update which card will be charged at renewal. If they are paying through PayPal, the subscription will show as managed through PayPal. If you have enabled customer-initiated cancellations in the Subscription Settings, customers can cancel their subscription directly from this screen.
If your store does not sell subscription items, the subscriptions section can be disabled from the customer portal menu and the associated pages can be turned off so customers never see the option.
License Keys
If any inventory items are configured to generate license keys, those keys are displayed here so customers can access them directly from their account. If a license key is tied to a subscription, the subscription column will show the subscription ID it is linked to - allowing customers to cross-reference the license keys page with their subscriptions page to see exactly which subscription controls each key before making any cancellation decisions.
Note: License keys are intended for businesses that connect to a third-party system to verify active license status for access control. If you sell recurring subscriptions but do not use license key validation in an external system, this section can be disabled from the customer portal menu and its pages turned off so customers are never shown it.
Profile
The profile page stores the customer's contact information and default billing country. Because Ratals Commerce supports multiple payment gateways configured by country, the checkout needs to know the customer's billing country before reaching the payment step - so it can display only the payment methods available in their region. The default billing country is stored on the profile and used automatically at checkout.
For customers without an account, the cart collects the billing country during the checkout flow and stores it for that session. If the customer creates an account at checkout, that billing country is saved to their new profile automatically.
Customers can also update their password from the profile page. If the password field is left blank when saving, no password change is attempted.
Save for Later Items
Customers can save items from their cart for later, which moves them to a saved items sidebar on the cart page. If a customer saves items before logging in and then logs into their account, those saved items are automatically associated with their account ID - making them accessible from any device the next time they log in.
Cart Items
Cart items persist the same way saved items do. If a customer adds items to their cart and then logs in, those items are saved to their account ID so the cart is waiting for them the next time they return - on any device. For customers without an account, cart contents are stored in a cookie and restored on their next visit. As soon as a login is detected, any cookie-based cart items are transferred to the account so nothing is lost in the transition.
Discount Codes
Discount codes give you a way to offer targeted promotions - whether to win back a prospect, reward loyal customers, or drive volume on specific products. Before using discount codes, make sure the discount code field is enabled on the cart page, as covered in the Cart Settings section. Discount codes in Ratals Commerce can be configured at two levels.
Product or Inventory Item Level
Product and inventory level discount codes apply the discount only to specific items rather than the entire cart. When creating a code at this level, you select whether it applies to products or inventory items, then enter the IDs you want the discount to apply to - separated by commas. When set at the product level, every inventory item attached to those products receives the discount. When set at the inventory level, only the specific inventory items listed receive it.
After entering the IDs, you set the discount amount and whether it applies as a percentage or a fixed amount. You can also set a minimum line item value that must be met before the discount is applied. This is useful for protecting margin on fixed amount discounts - for example, requiring a line item total of at least $50.00 before a $10.00 discount is applied.
Cart Subtotal Level
Cart subtotal level codes apply the discount when the overall cart reaches a minimum value, rather than targeting specific products or inventory items. Set the minimum subtotal required and the discount - percentage or fixed amount - is applied automatically when the cart meets or exceeds that threshold.
Both levels support tiered discount structures on a single code. You can configure multiple thresholds so the discount increases as the cart value grows - for example, 10% off at $100, 15% off at $200, and 20% off at $300. The cart calculates and applies the correct tier automatically based on the subtotal at the time the code is entered. This makes it straightforward to incentivize larger orders without needing separate codes for each tier.
If you want a discount code to run for a limited time, start and end dates can be set so the code activates and expires automatically without any manual intervention.
Shopping Feeds
Shopping feeds generate URLs you can submit to shopping engines and AI agent platforms to get your products listed in their product discovery and shopping spaces. Each feed URL contains the inventory data those engines need to display your products - including pricing, descriptions, GTINs, attributes, condition, and product page URLs. Setting up a feed in Ratals Commerce is a two-step process: create the feed URL, then add the inventory you want included in it.
Setting Up the Feed URL
Shopping feed URLs are created using the same URL system used throughout Ratals. Most fields are not required for a feed - the only fields you need to complete are the URL, the feed title, the template to load the feed in, and the country the feed is intended for. The country setting tells shopping engines which market the feed targets. All other fields - including sitemap display, site search, posted date, and last updated date - should be set to No for a shopping feed URL.
Adding Inventory to the Feed
Once the feed URL exists, edit it and click the Sub Items link, then click Add Inventory. Select the product page the inventory is assigned to, then select the specific inventory item you want to include. Ratals Commerce will automatically pull the product page URL, all inventory data, and any attribute or custom field data configured on that item.
If you want to use different names or descriptions in the feed than what appears on the product page, custom values can be set per inventory item within the feed. This allows you to optimize each item's feed content independently from how it is presented on the storefront - useful when shopping engines reward feed-specific copy or when product page descriptions are not written with feed placement in mind.
Once the URL is set up and inventory is added, submit the feed URL to your target shopping engines. It is recommended to keep each feed URL to no more than 500 inventory items. If you have a large catalog, build separate feed URLs organized by product topic or category - this keeps each feed focused, easier to manage, and simpler to troubleshoot if a shopping engine flags an issue with specific items.
Affiliates
An affiliate program lets you build a network of partners who send traffic to your store in exchange for a commission on the sales or leads they generate. Affiliates get a unique link from their account that tracks the traffic they send - when that traffic converts into an order or a lead, they earn the commission rate you have set for them. It is a channel that grows alongside your business without fixed marketing costs.
Customers can apply to join your affiliate program directly from the Customer Account Portal. If you want to offer an affiliate program, leave the affiliate section enabled in the customer portal menu and keep the associated pages active.
Approving Affiliates
When a customer submits an affiliate application, it appears on your admin dashboard for review. Once approved, you control whether the affiliate is eligible for payout. If your business requires tax or VAT documentation from affiliates before paying them - such as a W-9 or equivalent - you can mark them as not eligible for payout until that paperwork has been received. The affiliate can see their approval status and the payout eligibility flag from their account, so they know exactly what is needed before they can be paid.
Commission Structure
Commission rates are set per affiliate, giving you the flexibility to pay higher rates to partners driving significant volume. Each affiliate can be configured to earn commission on sales, leads, or both. Affiliates can see their commission rates, payout history, and searchable payment records directly from their account.
Cookie tracking duration is also set per affiliate, controlling how long after a first click an affiliate gets credit for a conversion. Affiliates can see their cookie window from their account so they understand how long a referred visitor has to convert for the sale to be attributed to them.
Sales and Lead Tracking
For leads, affiliates can see how many leads they have submitted. When you mark a lead as valid on the lead record, the affiliate sees it flagged for payout in their account.
For sales, no manual approval is required on your end - when an order attributed to an affiliate reaches a status of processing or complete, the commission is automatically marked for payout. If the order is later canceled or returned, the commission is voided automatically. Order status drives the entire payout qualification process, keeping affiliate accounting accurate without manual intervention.
Abandoned Cart Leads
When a visitor adds items to their cart and submits their information to calculate shipping and tax, that information is saved as an abandoned cart lead - along with every item in their cart at the time. These are visitors who showed clear purchase intent but did not complete checkout, and they represent some of the highest-value leads your store generates.
The abandoned cart leads table shows whether each lead includes contact information, making it easy to identify which leads are actionable for follow-up. Leads without contact details are anonymous sessions, but they still show you patterns in cart drop-off behavior.
Sales Team Follow-Up
For businesses with a sales team, abandoned cart leads are a built-in prospecting list. A visitor who built a cart and requested a shipping quote knows what they want - they just did not complete the purchase. A timely follow-up call or email from your team can often close these sales, especially for higher-ticket items where customers may have had a question, wanted to compare options, or simply got interrupted. To follow up, your team clicks the "Login to Customer Cart" button on the lead record - this gives the admin user access to that customer's cart and checkout only.
Customer with an Account
The admin user can see everything in the cart, along with the customer's saved shipping address, contact information, and the last four digits of any saved payment method needed to complete checkout. This information is displayed only within the cart and checkout process and cannot be edited from the customer session. The admin user cannot access the customer's account area, including order history, account settings, address management, or saved payment methods. If customer information needs to be updated, the admin user must return to the Customer Accounts section of the admin and make the changes there.
If the customer is ready to buy, the admin user can complete checkout on their behalf while speaking with them. While customer cart mode is active, a red banner displays at the top of every page so the admin user always knows they are acting on behalf of a customer. A logout button returns the admin user to their own session when finished. If an order is placed this way, the order's Referrer Source will show the admin user's name, providing a clear record of who placed the order.
Customer without an Account
For customers who checked out as a guest, the admin user joins the customer's cart session instead of logging into an account - there is no account to log into. The admin user can add items to the cart and complete checkout on the customer's behalf, the same as with a registered customer. The same red banner and logout button apply while the session is active, and any order placed this way also shows the admin user's name in the Referrer Source.
Automated Cart Recovery
If you do not have a sales team or want to supplement manual follow-up with automation, Ratals Commerce can send cart recovery emails automatically after a period of inactivity you configure. Recovery emails are sent through the Ratals SMTP mailer for reliable delivery and can include a discount code to give customers an additional incentive to return and complete their purchase. Full setup details are covered in the Customer Account Management section.
Conversion Intelligence
Beyond recovery, abandoned cart leads are a feedback mechanism for your store. Patterns in what gets added to carts but not purchased can surface pricing issues, shipping cost friction, delivery time concerns, or product page gaps that are quietly suppressing conversion. Reviewing leads regularly - even without direct follow-up - gives you a clearer picture of where customers are dropping off and what changes might bring more of them across the finish line.
Failed Logins
Failed login tracking is a built-in security layer that gives you immediate visibility into unauthorized access attempts against customer accounts on your store. Credential stuffing and brute force attacks - where automated tools cycle through username and password combinations at high volume - are common against ecommerce stores because customer accounts can hold saved payment methods, order history, and personal information. Knowing when these attempts are happening, and being able to act on them quickly, is an important part of protecting your customers.
How It Works
Every failed login attempt is recorded and surfaced on the admin dashboard so you are notified as soon as unusual activity begins. Failed login records are retained for one hour. If the same IP address exceeds the configured number of failed attempts within that hour, it is automatically blocked and the visitor is shown a message informing them they have reached the maximum failed attempts and must wait before trying again. This rate limiting stops automated attacks from cycling through large numbers of password combinations without any manual intervention on your part.
Failed Login Settings
The behavior of the failed login system is fully configurable from the admin security settings rather than being hardcoded. The following options are available:
Block IP Addresses for 1 Hour with Too Many Failed Login Attempts - enables or disables automatic IP blocking when the failed attempt threshold is reached. Set to Yes to activate brute force protection.
Number of Failed Login Attempts Allowed Within a 1 Hour Period - sets the threshold before an IP is blocked. The default is 5 attempts. Lower this number for stricter protection or raise it if legitimate customers are being blocked due to forgotten passwords.
Send Email When an IP Address Gets Blocked - when set to Yes, an email notification is sent automatically each time an IP is blocked, so you are alerted to brute force activity in real time without having to monitor the admin manually.
Email Address to Send Block Notifications To - the email address that receives blocking notifications. Set this to whoever on your team should be alerted when suspicious login activity is detected.
Blocking Suspicious IPs
If you notice a pattern of repeated failed login attempts from the same IP addresses - particularly a sudden spike in volume that suggests an automated attack - those IPs can be permanently blocked in the Security Settings section of the admin. Blocking at the IP level stops the traffic before it even reaches the login form, reducing server load and eliminating the attempts entirely rather than just rate limiting them.
What This Means for Your Customers
Strong password requirements are enforced at account creation, which raises the baseline difficulty for any attack. Combined with configurable rate limiting and IP blocking, Ratals Commerce gives you a layered defense that protects customer accounts without requiring any third-party security plugins or additional configuration out of the box.
This is also another reason Ratals does not store real card numbers in its database. Even in the event that a determined attacker were to gain access to an account, there are no card numbers to steal - and even the profile IDs used to reference the card data at Authorize.net are never exposed in the customer-facing account, so there is nothing in the account itself that could be used to access or retrieve the underlying card data. The most sensitive financial data never exists in your database in the first place, which is a fundamentally stronger security position than encrypting card numbers and hoping the encryption holds.
Monitoring the failed logins section periodically - and acting quickly when patterns appear - keeps your store and your customer's data protected.
Failed login attempts older than one hour are automatically deleted from the database, keeping the failed logins table small and ensuring it never becomes a source of performance drag on your site over time.
Note: If the admin user does not have permissions to view the failed logins page in the admin, this will be hidden on the dashboard to keep user data hidden to only those that need to access it.
Declined Card Attempts
Declined card attempt tracking is a built-in defense against card testing - a common form of fraud where bad actors use your checkout to validate stolen credit card numbers at scale. Card testing works by cycling through stolen card numbers one at a time to see which ones are still active. Left undetected, it can result in chargebacks, processor flags, and potential suspension of your payment gateway account. Ratals Commerce monitors declined card attempts at the IP level and alerts you - or automatically blocks the IP - when suspicious activity is detected.
How Decline Tracking Works
Every declined card attempt is recorded and surfaced on the admin dashboard alongside failed login attempts, giving you a single place to monitor both types of suspicious activity. Declined attempts are tracked by IP address and retained for a configurable number of days.
Ratals Commerce counts decline attempts intelligently, identifying cards by their last four digits only - the full card number is never tracked. If the same IP address uses the same card (last four digits) multiple times and is declined each time, that counts as a single attempt - a legitimate customer entering the wrong card details will not be penalized for retrying. However, if the same IP address is declined using cards with a different set of last four digits, each one counts as a separate attempt. This distinction is what separates a frustrated legitimate customer from someone cycling through stolen cards, and it is what makes the detection accurate.
Declined Card Settings
The declined card system is fully configurable from the admin security settings. The following options are available:
Days to Save Decline Attempts - controls how long declined attempt records are retained per IP address. The default is 30 days. Unlike failed login attempts which clear after one hour, card testing patterns can play out over longer periods, so a longer retention window gives you a more complete picture of activity from a given IP.
Max Card Decline Attempts for an IP Address - sets the number of unique card numbers that can be declined from the same IP before action is taken. The default is 10. Each unique last-four-digits of a card number from the same IP counts as one attempt toward this threshold.
When the Maximum Is Reached - controls what happens when an IP hits the threshold. You can choose to receive an email notification only, allowing you to review the activity and block the IP manually, or you can have the software email you and automatically block the IP address immediately. For stores with high transaction volume, automatic blocking is the recommended option.
Email Address to Send Notifications To - the email address that receives alerts when an IP address reaches the decline threshold, whether the IP is blocked automatically or flagged for manual review.
What This Means for Your Store
Card testing is a serious risk for any online store that accepts card payments. Payment processors monitor chargeback rates and decline ratios, and a store that becomes a target for card testing can face increased processing fees, rolling reserves, or account termination. Catching it early - before it reaches a volume that triggers processor scrutiny - protects both your revenue and your ability to accept payments.
Without detection in place, a single attacker can run through dozens or hundreds of stolen numbers before you notice anything unusual. By flagging IPs that rack up repeated declines across cards with different last four digits, Ratals Commerce interrupts this pattern early - before your store becomes a reliable testing ground bad actors return to.
Note: If the admin user does not have permissions to view the declined card attempts page in the admin, this will be hidden on the dashboard to keep user data hidden to only those that need to access it.
Why Businesses Choose Ratals Commerce
Ratals Commerce is a self-hosted, business-first ecommerce platform. It is built to keep you selling as your business grows - without forcing you to change platforms, migrate data, or rebuild what you have already configured when your operation outgrows what most platforms can handle.
Commerce Built Into the Platform. Not Bolted On.
Ratals Commerce is not a shopping cart added to a CMS - it is a commerce system built into the same architecture that powers your content, your URLs, your SEO, and your site structure. Vendors, inventory, products, categories, orders, customers, and fulfillment all live in the same platform and connect to one another without any integration work. When a customer places an order, warehouse allocation happens automatically. When inventory runs low, product pages respond automatically. When an order ships, the customer is notified automatically. The system is designed to reflect how a business actually operates, not how most ecommerce software is built.
Shipping That Works Like Your Warehouse Does.
Ratals Commerce cubes every order before requesting carrier rates - calculating exact box dimensions and weights from your inventory data before a single rate request is sent. Customers see accurate shipping costs at checkout, not estimates. Orders are automatically allocated to the closest warehouse with available stock. Dropship locations, backorder rules, and LTL freight thresholds are all handled by the same system. Whether you ship from one location or a hundred, the platform manages allocation and quoting without manual intervention.
Analytics That Tell the Story Behind Your Revenue.
Ratals Commerce analytics are designed around three questions every business needs to answer daily - how much traffic am I getting, how much of it is converting, and how much revenue is each order generating. Orders, conversion rate, product revenue, shipping revenue, discounts applied, landed cost, profit margin, and average order value are all visible in a single dashboard view for any time period. When revenue is down, you can see immediately whether the cause is traffic, conversion, or average order - three different problems that require three different responses. And for businesses with a sales team, the same dashboard doubles as a performance tool, attributing phone and in-person orders to the administrator who entered them so you can track individual sales performance alongside your online metrics.
Built-In Tools That Replace Third-Party Dependencies.
Cart recovery emails, product review request emails, affiliate tracking, shopping feeds, discount codes, license key generation, subscription billing, and fraud protection are all built into Ratals Commerce with no additional cost and no third-party plugins required. Recovery and review emails send through an authenticated SMTP mailer so SPF and DKIM pass and deliverability remains high. Affiliate payouts are automated by order status. Shopping feeds are fully customizable per inventory item. The entire feature set covered in this guide works from day one without assembling tools from multiple vendors.
Flat Pricing. No Transaction Fees. No Per-User Charges.
Ratals Commerce is licensed at a flat monthly rate with no transaction fees taken from your revenue, no per-user charges as your team grows, and no feature tiers that lock core commerce functionality behind a higher plan. The full feature set covered in this guide is available as long as your subscription is active. If a subscription renewal ever lapses, your storefront continues running without interruption - customers can still browse, add to cart, and place orders. Only the admin is restricted until the subscription is renewed, and as soon as payment is made, full functionality is reinstated immediately.
A Path From Store to Full Business Platform.
Ratals Commerce is built on the same foundation as Ratals CMS. When your business is ready to move into purchasing, accounts payable, landed cost calculation, journal entries, and full accounting operations, Ratals ERP builds directly on top of everything already configured in Commerce - your vendors, inventory, customers, and order history carry forward without migration. That upgrade path from an online store, or multiple stores, to a fully integrated business system is not available at this price point anywhere else.
Your store should grow into your business. Your business should never have to be rebuilt around your store.
Ready to Get Started?
Ratals Commerce runs on top of Ratals CMS, which is open-source and free to download. If you have not installed Ratals CMS yet, get it running on your own server and start building your online store. When you are ready to sell, upgrading to Commerce takes minutes - purchase your license on the pricing page, enter the license key into your installation, and everything covered in this guide is ready to configure. Your store, your server, your data - with a platform built to grow alongside your business from day one.
Start free with the CMS, then add Commerce, ERP, or AI only when you need them. Each one activates on your existing installation - no migration, no replatforming, no rebuild - ever.
See how our single-data-model architecture lets your entire business run on one connected system instead of stitching together separate software applications.